All Sides of a Mosaic Umbrella Stand

I realized the other day, that there are quite a few mosaics that have never made it to the blog. Ones I like but have never gotten around to photographing. I’m trying to remember when I actually made this umbrella stand. Years and years ago. It spends it’s time in the front hall, bristling with umbrellas, canes, long handled shoe horns, and in direct site of the couch so I see everyday and I still enjoy looking at it. That’s the thing about mosaic, it’s like eye candy, always something to look at.  Watch the cup handle as it turns from pic to pic.

Mosaic Umbrella Stand, Helen Bushell, summerhouseart.comMosaic Umbrella Stand, Helen Bushell, summerhouseart.com 
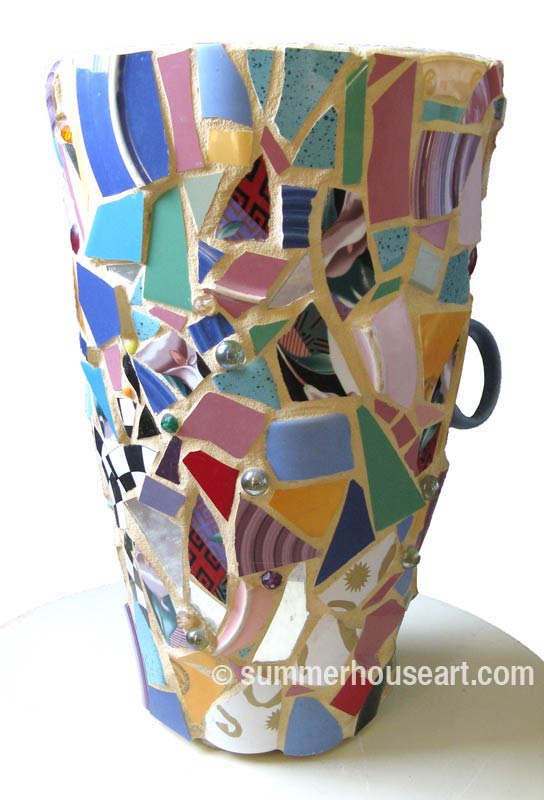
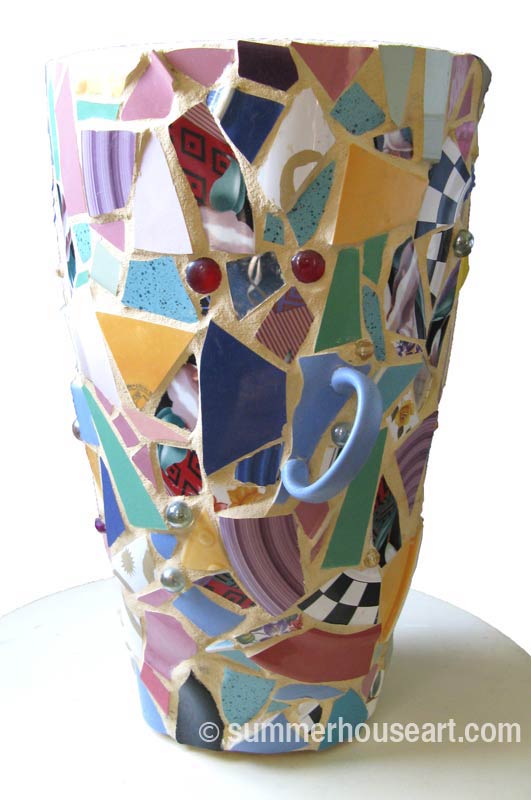
Continue reading “All Sides of a Mosaic Umbrella Stand”

Share

Just A Few Scraps of Stained Glass …

You just never know where a few scraps of stained glass will lead to…Blue and Orange stained glass abstract, Helen Bushell, summerhouseart.com

I’m one of those people who never throws much out. As artists, we can see potential in old chipped dishes, old furniture, old scraps of paper and magazines, and even old scraps of stained glass. Back in 2010, I’d been given lots of small stained glass scraps by someone who was cleaning out “junk”. Well, as it’s often said, one persons junk is another persons treasure. My friends know me well, and later that year, I got a couple of boxes of stained glass scraps for my birthday and I did make some mosaics with these scraps.

Abstract glass mosaic, Helen Bushell, summerhouseart.com

And then, everything sort of sat around for a bit. But I did happen to have an old illuminated sign box that I use as light table. Now the thing about colored glass, what really excites me, is what happens to all that color when light shines through it.

So a few years ago I started to have some fun applying shards of glass to glass, first old windows then those glass frames you used to be able to find where you have to sandwich the picture between two sheets of very thin glass. Now, I wasn’t interested in creating the usual stained glass where you surround the piece with leading, because what really interested me was the layering of color in the light. And I got a bit frustrated gluing glass on glass until either Will or my son Dave, walked by and said, “Well, why don’t you just glue glass to both sides of the glass?” Well, duh. And that is how I got onto gluing glass on both sides of the glass.

Also, I wasn’t interested in creating pictures with glass. What I played with was just using the scraps as they were and creating abstracts with them. Which turned out, at least to me, rather well. I loved the look and the windows have been sitting on windowsills in the house ever since I made them. Here’s another view of the glass piece at the top of the post.

Abstract Glass in Window, Helen Bushell, summerhouseart.com

Now the beauty of having a mind that’s open to possibilities is that you never know where you will end up next.

I’ve always wanted to do more with those compositions, and I looked at light boxes and all sorts of things for a while and then just sort of forgot about it all. Then a few weeks ago I was looking at prints, and print files and looking around for what I could convert into prints. And in one of those ah hah moments my eye lit on the stained glass comps in the windows of the kitchen. So, together with Will, who is more of a master of photoshop than I, I played around with it and found that the glass transformed really well into abstract compositions on paper. Which we immediately ran through our new printer and loved the result.

We do have some print on demand shops, one being our shop on Society6. So today, I’m happy to show the first of these new Stained Glass Prints,

composition-in-blue-and-orange131768-framed-prints Society6

already converted into a few fun home decor products, one a pillow, and much more to come yet. Just click on the pics to go to Society 6.

stained glass society6-pillow by summerhouseart.com

 BTW if you’d like to comment, and we do appreciate comments, please just click on the title to bring up the post with a spot for comments at the bottom.)

Save

Save

Save

Save

Save

Save

Save

Save

Save

Save

Share

Upcycling to Create a New Boho Daybed

Before: the old couch summerhouseart.com

Ah, Before and After. This is the story of an old hide-a-bed couch being replaced with an up-cycled Daybed very thriftily made and done up in Boho style.

After: New Daybed summerhouseart.com

 The old couch, with its unbleached cotton cover hiding stains, old age, many, many years of wear, not to mention large shreddy bits made by long gone cats, just had to go! It just so happened that we had most of the components for a new daybed, stored in the basement, waiting to be transformed. Something much more comfy and better looking than a lumpy, old hide-a-bed. We’d just been waiting for a little time to tackle it.

First, had to get the old couch hauled away by a company that would make sure it all got recycled. We had the rails of an old Ikea single bed, missing the slats. Not sure, but I think they may have been used for some other project. We had a couple of substantial wooden chair or couch arms that one of our sons had found years ago and brought home.

Will, stapling the slats made from pallets, summerhouseart.com

We had saved the two foam seat cushions from the old couch to make new back cushions from. We cut those in half with an old electric carving knife and made four cushions from them.

Old foam seats now backs for new daybed, summerhouseart.com

Will, in the mean time had ingeniously figured out a way to attach the arms of the chair to the rails of the bed. And like so many people these days…. he recycled some pallets into slats for the bed. The only new thing we ended up getting was the actual foam mattress. An Eco foam mattress, so no off-gassing etc.

The aforementioned unbleached cotton cover was sewn into “new” covers for the foam. And the material from a thrift shop duvet cover became new covers for the cushions.

And finally, a chance to get creative with all my fabric stash, collected from garage sales and thrift shops. Chaos while deciding on the fabrics I’d use.

Fabric chaos, deciding on fabrics for new pillows, summerhouseart.com

Lovely new pillows, in the Boho Style.

2 new Pillows for the Boho Daybed, summerhouseart.com

Love how the fabric looks with an iris.

Iris with new pillow fabric, summerhouseart.com

And tah dah! New daybed! We love it! Finally a place for napping where you can actually stretch right out and really relax. Makes a nice couch too.

New Daybed, summerhouseart.com

Save

Save

Share

Playing With Collage on Quiet Afternoon

Round the Bend, collage, by Will Bushell, summerhouseart.com
Round the Bend, collage, by Will Bushell

We look for old magazines at garage sales, but with a difference. Not necessarily to read, although we often do, but we are looking more for interesting papers and colors and images to use one day in collage. Lately, I’ve fallen in love with the inside of business envelopes, they often have such lovely textures to use. My favourite for now is Speckle #10.

Map line with speckle, collage, by Helen Bushell, summerhouseart.com
Map line with speckle, collage, by Helen Bushell

I’m also afraid that I hardly ever throw anything out. So I also have a box of scraps from former collage afternoons. Just in case we might need that particular letter or color or texture.

It's all in the wrist, collage by Will Bushell, summerhouseart.com
It’s all in the wrist, collage by Will Bushell,

Someone once commented on the fact that we’ve got an awful lot of stuff saved, from magazines, to scraps of stained glass, old dishes and ornaments, and even a stack of old furniture. They asked if we are hoarders. Well, I replied, artists are never hoarders, we’re just collectors with plans.

Grid with color, collage, by Helen Bushell, summerhouseart.com
Grid with color, collage, by Helen Bushell

So of course, if we decide on a quiet afternoon to make some collages, we’re ready to roll, or should I say cut and paste in minutes. We have old Train mags, old Wallpaper mags, all sorts of old magazines, we have a big glue stick and a few pairs of scissors. So the kitchen table is cleared and the fun begins! And sometimes, the chaos of magazines, scraps and glue stick might remain on the table for a few days and we eat our breakfasts around it all. Until……one day we say, let’s put it away until another collage day comes along.

Speckle #10, collage by Helen Bushell, summerhouseart.com
Speckle #10, collage by Helen Bushell

As you can see, we have very different styles, even though we are both working intuitively. I’m sort of the type who likes to keep piling it on until I like it, the more color the better. And Will, he works slowly, more deliberately, finally creating a perfectly balanced, minimal composition that I always love immediately. Even without the titles, it’s pretty easy to tell which collages are whose, right? Hope you enjoy. BTW you can find some of these images on Home decor products like pillows, wall art and even furniture in our Society 6 shop.

Tornado, collage, by Helen Bushell, summerhouseart.com
Tornado, collage, by Helen Bushell,
Share

A Bedside Table, appropriately titled, “Night Flyer”

This little night table is next in our series of upcycled furniture pieces. As we’ve gone on our Saturday garage sailing travels this summer we’ve found some lovely bits of furniture.

Bits that we are slowly and carefully applying our version of artistry to. This little night table started out as a rather plain black night table.

Black side Table Before

Black side table transformed
Will wandered around it for some time, waiting to find out what to do with it, or as he said, what the table told him it wanted. Finally, he decided that it wanted to be black and white. So the stripes on the drawer appeared.

Black side striped drawer
From that point on, it became a 3D painting. And not just on the drawer front as on the Green Night Table. The whole table became a painting where collaged bits appeared, and sanding down to the old colors to bring out it’s history and a bit of texture too.

Black side table painted top

Black side table painted interior

I rather like what sanding brought out in the legs, myself. The final flourish was the black and white drawer pull, oversized but with a definite sense of humour.

Night Flyer Table drawer pull

And yes, it does have a title, also after long deliberation. It’s called “Night Flyer”. Appropriate, don’t you think, for a night table?  This table, along with other art furniture we’ve made is now listed for sale on Diggit, a local online sales site.

"Night Flyer" Table By Will Bushell
“Night Flyer” Table By Will Bushell


Share

The Story of the Little Green Night Table

Almost everything creative that we do has some connection to recycling. My mosaics are made from recycled or as Will likes to say “upcycled” dishes and ornaments.

Will uses a lot of collage in his work using all sorts of found ephemera from old photos to just bits and pieces. We live this great life of searching for good used “stuff” to re-use, for our art, for our home and almost everything else. And now we are doing something with furniture. Such was the case with this little night table, found ages ago, waiting for an idea, a vision, of what it was to become.

I happened to say to Will, sort of offhandedly actually, “Why don’t you paint something on the front?” and walked away.

green-cabinet-beforewm

When I came back this is the abstract that he’d painted. We both loved it and then I sort of picked up the colors and finished it off.  

green-cabinet-2afterwm

It’s a little different, with a more contemporary feel.   I like the fact that the inside of the drawer is this lovely bright orange. The painting is done in such a way that it’ll gradually age and get that shabby artsy look.


green-cabinet-3wmgreen-cabinet-4wmgreen-cabinet-1wm

This little table got us excited about doing lots more…. and somehow we started to find more and more bits and pieces of old furniture to work on. We’ve actually been stockpiling it I’m afraid to say. And as we can get to each piece, we’ve been having some creative fun renewing them.

Share

Creating Texture and … Boomerangs?

The fun of working in Pique assiette mosaic is the inspiration you can find in a simple plate design. Trolling a thrift store one day, I’d found just a couple of plates with a pattern around the edge that just felt like the 50’s, bringing ideas of mid century design with it. I love that time in design. So optimistic about the future, so modern, and colorful.

One of the first things I show my students, sometimes even before we go shopping for good dishes to break, is how to create texture with lines. These plates are a perfect example. All the lines pretty well went from the outside to the inside of the rim with all lines going toward the center. But, when you break the plate, you have all these nice bits and pieces with lines that can be put back together in every which way. And that arbitrary rearrangement is exactly what creates this lovely texture.

 detail bits,Boomerang Mirror by Helen Bushell summerhouseart.com
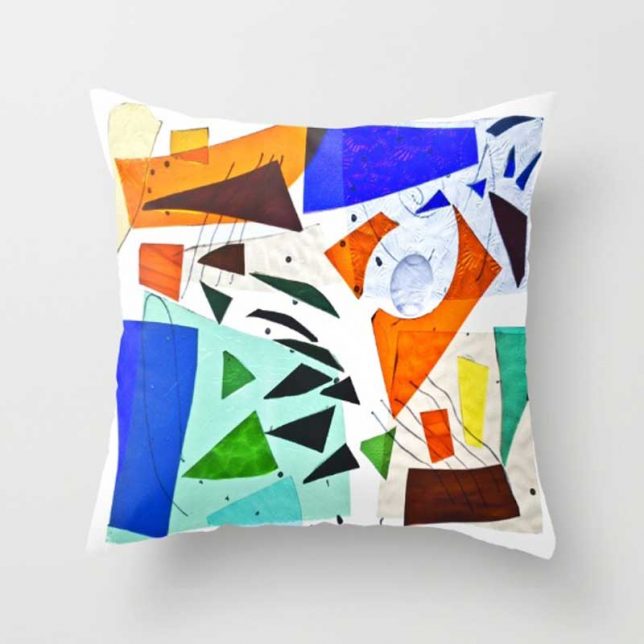
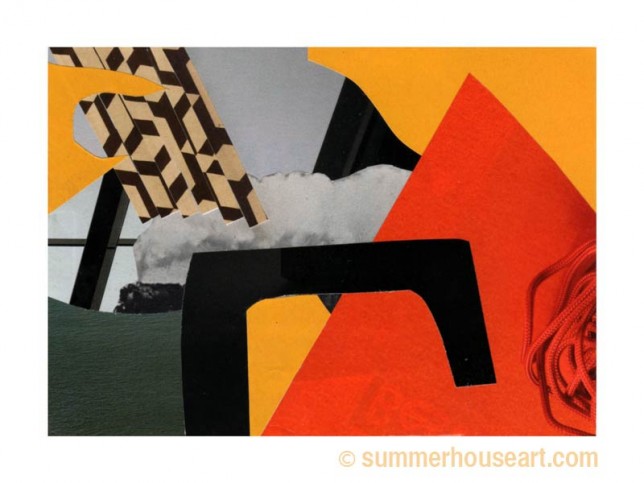
Since the design on the plate inspired me to think 50’s, one thing sort of naturally led to another.

 Boomerang Mirror by Helen Bushell summerhouseart.com

Boomerang Mirror by Helen Bushell summerhouseart.com

Boomerang Mirror by Helen Bushell summerhouseart.comA popular shape then was the boomerang which inspired a whole lot of boomerang shaped tables at the time. Ok I didn’t have enough dishes to create a top for a coffee table, but, I did have enough, with a little embellishment from other colors and tiles…..

to make Boomerang mirror. It’s not that big, at its widest point only 24 inches, but it packs an nice punch of lovely 50’s inspired color.

Boomerang Mirror by Helen Bushell summerhouseart.com

Share

A New Pique Assiette Mirror or The Beach Pottery Shard Experiment

Beach Pottery shards, Summerhouseart.com
My latest student has a dream of creating a mirror with four special tiles and a huge collection of beach pottery shards that she has been collecting for years. When I saw the tiles and her collection of beach pottery I knew instantly that the shards and tiles were meant to be together. But it left me with a problem to solve. I have always avoided using beach pottery shards for mosaic because I was afraid of how grout would react with them. A year ago, I’d seen another mosaic artist use it on a vase and she had reported no problems with it. But I knew I had to try it out for myself. It was time for me to experiment on a small mirror.

Laying out Beach Pottery shards, Summerhouseart.com

Luckily I had been given someone’s entire collection of beach glass and pottery shards over a year ago and added it to my own collection. All those lovely worn, wave-washed pottery shards had been waiting in the greenhouse for this day.

Beach pottery shards feel smooth under your fingertips, their surfaces ground by waves and rocks. Unlike the shiny, grout-repelling porcelain surface you have on new dishes you now have a matte surface, worn and pitted. I wondered if the grout grittiness would ruin the surface and if the colorant in the grout would mar and color the surfaces and sink into the pits. I also wondered if I’d like the matte surface against the grout when I was so used to the jewel-like mixture of dull grout setting off shiny bits and pieces. Well, the only thing to do was try it.

Laying out Beach Pottery shards, Summerhouseart.com

Deciding on a random design, I started applying the pieces as they fit. I wanted to avoid having to cut the shards and preserve the smooth edges that they already had.

Laying out Beach Pottery shards, Summerhouseart.com

After spending a few hours listening to music and getting lost in the meditative world of fitting shards I was soon near the end and pretty happy with the result. I’d taken quite a few breaks, something I always recommend to my students, to stretch and move. It’s so easy to get caught up and give your self a nasty back spasm from being in the same position for too long lost in your work.

Mirror with Beach Pottery shards, Summerhouseart.com

I left it all overnight to allow the mastic to set and harden. Tomorrow would be the test. I must admit to some trepidation. I loved the surfaces on some of the shards so much that I was loath to lose them if the experiment failed.

Mirror with Beach Pottery shards, Summerhouseart.com

Next day, I mixed up the grout. After a little consideration, I’d chosen a colored grout that coincidentally evoked sandy beaches called Summer Tan. I needed to find out if the grout colorant would be a problem. And if it was a problem, at least this color, which was a bit rusty would at least blend in with the rustiness of some of the shards if it did sink into the pits on the surface.

Mirror with Beach Pottery shards, Summerhouseart.com

And the final result? Well, I must admit, it was a little harder to clean off the grout. The matte surfaces held onto the grout and developed a cement sheen that had to be rubbed off and even sponged. I hardly ever use a sponge, preferring instead to only clean with old cotton socks. Oh yes, there is a use for all those old cotton socks with big holes in the heels!

I loved the final look! This surface felt old and worn still and so smooth to the touch. It all looked antique and I wished in the end that I’d used an old worn mirror too. Ah well. Experiment done. I was glad though that I’d used the rusty colored grout, because where it did stay in the pits on the surface it looked natural.

Mirror with Beach Pottery shards, by Helen Bushell, Summerhouseart.com

Conclusion: yes it’ll look good and yes it will be a bit more work.. but all very well worth it. And next week we’ll use these results to help my student create her dream.

Share

#7 in the Pique Assiette Mosaic Inspiration Series – A Little Bird and an Abundance of Fruit

With this Pique Assiette mosaic shrine, the fruity patterns on the dishes created the main theme. As sometimes happens there was one dish that started the ball rolling. In this case it was the little plate with cherries.

Bird and Fruits mosaic, Helen Bushell, summerhouseart.com

Without a clear idea in mind, I started to set aside dishes I found with fruit patterns on them. I didn’t know where it was going, had no clue really, just a feeling that someday I’d do something with a fruit theme. Besides, all these fruity dishes were really quite beautiful. For months no real idea came to me as to what I’d do with them.

Then one day, probably while out shopping for dishes to break, with some of my students, I happened upon this wonderful little bird. I don’t know who designed this bird, who lovingly sculpted the original, but thank you, mystery artist. Ok, looking at it, it’s probably a collectible ornament, maybe even worth money, but to me it was the missing piece. It was the piece that twigged an idea. Fruit and birds, birds and fruit. We have grapes and kiwi in our garden as well as a small apple tree. Birds love these fruits. They like to take a tiny bite and move on to the next fruit.

Bird and Fruits mosaic, Helen Bushell, summerhouseart.com

I saw the bird on a shelf and immediately knew the bird should be reflected in a mirror. Then I needed fruit. Where to get some? Well, thrift stores are full of fake fruit, nice squishy fake grapes and cherries, pear salt and pepper shakers, apple and orange ornaments. It didn’t take long at all to collect what I needed.

I often tell my students that making art is all about making one decision after another, often using intuition. In this case, once I had the final ingredients, all the decisions seemed to make themselves. For one, I made everything rounded, the shelf, the shape of the support, it all seemed to call for roundness, fullness, dare I say rounded fruitiness.

I could have done the mosaic pieces as a random overall pattern but chose instead to group the patterns in flowing areas to set off the cherry plate. The piece was almost too easy to do. I let intuition guide my decisions and with the find of the bird ornament, the piece just “flew” together. OK, OK, I’ll stop now.

detail, Bird and Fruits mosaic, Helen Bushell, summerhouseart.com

Then last, but not least, I wanted it feel abundant, like the way that trees and vines full of fruit make us feel. Under the shelf, I glued veritable bunches of those nice squishy, kitschy grapes and a few cherries, so it was practically dripping abundance. I’ve given the pretty bird a setting, a home. I like it, it makes me smile. That’s all I really need.

Share

#6 in the Pique Assiette Mosaic Inspiration Series – Using Intuitive Design on Pots or How Not to Be a Control Freak

Mosaic Inspiration #4 I talked about the intuitive process to create an overall random design on a flat surface like a mirror. And if you’ve looked at our stepping stones you’ll see that I use this method there as well. I admit, I like working this way, it’s meditative and challenging at the same time and never boring. And there are benefits!

 Mosaic Pot by Helen Bushell, summerhouseart.com

Now, I have to say that working like this is especially fun on 3D surfaces like pots. I’ve done quite a few pots in this manner. In each case, I selected dishes that had colors, patterns and textures that I liked together. To those, I added some solid colors and a few marbles. Marbles have a way of glowing when the light shines through, that I find totally captivating.

Pique assiette Mosaic Pot by Helen Bushell, summerhouseart.com

I tell my students that doing intuitive mosaic design has one really great benefit, especially if you tend to be a control freak. You will learn to let go. Working intuitively allows you to forget control and just go with the flow. After all you are not creating a picture, or a rigid pattern. Nope, just an overall pattern with a mixture of surface designs. Ah, the freedom to just let go and mix it up.

Going with the flow also applies to fitting dishes onto a curved surface. A dish does not have the same curvature as a pot. To make up for this you often have to adjust how you apply a piece to the curve of the pot. Oh sure, you can keep breaking the piece till it’s small enough to apply to the curve ( um, this could be called exerting control) or…you can just find the curve of the dish and find a place where it will match the curve of the pot. Ah, even less control.


Pique assiette Mosaic Pot by Helen Bushell, summerhouseart.com


Pique assiette Mosaic Pot by Helen Bushell, summerhouseart.com

Using dishes that have color on the bottom as well, creates an extra little benefit. The ridge on the under side of the plate, once broken, can be pieced back together to create some very nice undulating lines, thank you. I’ve used this often to create a flow or direction. It’s a little trick that I totally took advantage of on some of these pots.

Pique assiette Mosaic Pot by Helen Bushell, summerhouseart.com

The last little benefit about applying pique assiette mosaic to pots is that unlike a flat surface like a tray or mirror frame, you can’t see the whole surface at once. You may ask, how is this a benefit? Well, if you get tired of one side you just turn the pot around and viola, you have a whole new surface to feast your eyes on.

Share