Doing Some Artsy Experimenting with Beach Pottery

Beachcombing treasure summerhouseart.com

In the spring and summer I tend to check online for low tides. And if it’s nice out, and the tide is really low in the morning, I’ll be convincing Will that we really need to go beach combing in Sidney. Luckily, he usually doesn’t need much persuading. Now you don’t want to know how much beach pottery I’ve already collected.. ok, LOTS.

But there is something about wandering up and down on the beach, head and eyes down, with the sun and the seagulls overhead, the smell of the ocean around you, searching for those lucky finds. It’s so calming and lovely. If I’m going to have an addiction, I’ll take beach combing any day.

But what do you do with all these lovely finds? So far, we’ve had a good time creating birdbaths and mirror frames with it.

Beach Pottery Mosaic Birdbath by summerhouseart.com

We have plans, in the summer, for making a couple of garden sculptures covered in pottery.

And Will has been making jewelry from driftwood and beach glass and pottery for our new Etsy shop, FoundMadeArt.

Sea Pottery Pendant by Will Bushell, FoundMadeArt

I had an idea of creating small wall pieces with the bits all arranged like a collage, but shipping weight was a problem. Then I discovered Wedi board on an online mosaic site. It’s relatively unknown in Canada, I had to search like mad and finally found a tiling company in Nanaimo that had just started carrying it. It’s a light weight substrate created for bathroom tiling, with foam sandwiched between two thin layers of cement. Trust mosaic artists to see some new uses for this product. Suddenly a lightweight substrate for outdoor mosaic instead of heavy cement board!

I thought if I created some small wall pieces, they would be quite ship-able with the low weight. Wedi board is a bit more expensive than cement board and you have to buy special hangers for it too, but I thought, it would be worth a bit of experimentation. So with thanks to my sister and her husband, in Nanaimo, who very nicely brought down the 3ft x 5ft. sheet for me when they came for tea and goodies, I had something to work with.

The beauty of Wedi board is that you can cut it with a utility knife. I decided to start small with 6 in x 6 in pieces. Then, after lots more research online ( don’t you just love youtube?) I decided to cover each piece with a thin coat of mortar to hide the grey surface.

Then came playing and trying out layouts some chosen bits of found beach pottery. All, btw, freshly washed and dried to remove the salt residue. Kind of funny to think there I was washing dishes that had come from the ocean.

playing with beach pottery layout, summerhouseart.com

The first experimental arrangement went through lots of changes, I even took photos so I could test the look.

Beach Pottery layout, summerhouseart.com

And then, with the air getting rather blue, because of the difficulty of trying to adhere the pieces without getting mortar everywhere, the first piece was done.

Beach Pottery wall piece, Helen Bushell, summerhouseart.com

For the next piece, I decided to wing it. I basically chose the pottery I was hoping to use and applied mortar and stuck them down with less worry about placement, using intuition and speed mainly. You don’t have much time with mortar anyway. It may be a method I’ll use in the future, when I try to create more of these little wall pieces. These are just the start of a new idea. Who knows where it will lead? One day, hopefully, they’ll be for sale on our Etsy shop. One thing I do know, is that I’ve got an awful lot of beach finds that need a home. And I do have a bit of beach combing addiction.

Beach Pottery wall piece, Helen Bushell, summerhouseart.com

(BTW, if you’d like to make a comment, just click on the title.  It’ll take you to comments….and we do appreciate comments )

Save

Save

Save

Save

Save

Save

Save

Save

Save

Share

A Two Spark Plug Day!

In my most recent post I was looking forward to beach combing in Sidney. It’s such a treat! I love to go there to look for beach pottery for our mosaics. And also for the calming atmosphere of the ocean at low tide, blue skies, the sound of the waves,

dock-&-seaweed summerhouseart.com

pilings with drying cormorants,

drying-cormorant, summerhouseart.com

sailboats with Mt Baker in the distance.

sailboat with Mt Baker in distance, summerhouseart.com

 Of course, there’s lots of beach glass too, but I tend to ignore it… unless it’s really special.  And the occasional dead crab, this one was so beautiful surrounded by flowing seaweed.

crab with flowing seaweed summerhouseart.com

And I’ve got lots of pottery now, too. What I was really looking for was spark plugs. Spark plugs on the beach? Well, yes, they do turn up, but only very occasionally. And to me they are precious. They stand out in a mosaic of beach pottery and I know I must have some for a mosaic sculpture, already imagined, that we’ll start on this summer.

Oh how I wish I was on the Thames sometimes “mudlarking” and finding clay pipes, so lovely as texture in mosaics. But I am on Vancouver Island, not in London, and I am quite ecstatic at the discovery of a spark plug. A spark plug long ago thrown out in the ocean dump (what were they thinking?) to wash up on shore hidden in the seaweed and rocks.

And though I found lots of pottery and a bit of garbage too, like the plastic fork,

Beach pottery haul summerhouseart.com

and an odd little glass dome, the size of a thimble,

sea glass-dome summerhouseart.com

I wandered up and down the beach, for hours, searching for spark plugs. And then, standing still, staring vacantly at the beach at my feet, I found one! And then I turned and found another! Oh thank you low tide!

beach find, spark plugs-summerhouseart.com

It doesn’t take much to make me extremely happy! A Two Spark Plug day will do it.


Share

Low Tide Fun Tomorrow

Horizon with Mt Baker, Sidney BC photo summerhouseart.com

Can’t wait until tomorrow.  I’ve been checking the tide charts and it’ll be a good low tide at the right time.  We’ll be out on the beach in Sidney, just off the pier and this will be our view for the day, with seagulls wheeling about overhead, and the occasional ferry or sailboat on the horizon. We’ll be out poking through the seaweed, searching for pottery shards and getting very mellow.  I’ll check back with our finds.  We’re planning a couple of new sculptures for the garden to go with the birdbaths.  Looking forward to summer and making more Beach pottery mosaics.

Share

Woo hoo, a new theme look and a new Gallery

I’ve been busy lately.  Well, to be quite honest, Will and I have been busy with the blog lately.  I really need him to keep me from losing patience with software and help with learning how to do things.   We wanted a few changes in the blog.  For one, the look of it.  So we chose a new theme.  We find it a bit cleaner looking than the old theme.

And then I discovered a new (to me, anyway) gallery plug in for WordPress called Catablog. Of course, being me, I had to have it.  I thought that having a gallery of my mosaic posts would make it so much easier to visually navigate the blog if you were looking for mosaics alone. I wanted anyone to be able to search through the pics of mosaics and just click the title to go to the post about it. So after much fussing and fuming on my part, and dogged determination from both of us, we managed to create the aforementioned gallery. You can find it here.  

Or, just click on Mosaic Posts Gallery on the Menu bar above.  Enjoy!

Share

Creating Another Beach Pottery Bird Bath (and there’s a movie too!)

Low Tide, Sidney BC, photo summerhouseart.com

Way back in March, we happened to notice that the tides were very low and the idea struck me that we should go out to Sidney and collect some beach pottery. So off we went to the best beach pottery beach and went wild scooping up beach pottery in our little rice bags. Everyone else was looking for glass and overlooked all the lovely pottery. But we had plan for it.

Bag of beach potter shards, summerhouseart.com

We’d made a bird bath before with pottery and beach glass. Way back when we moved into this house, we’d found, under the laurel hedge, at the back amongst a lot of debris, a birdbath pedestal. The basin or bowl was long gone and we’d put it up in the garden with a plastic bowl on top with a couple of rocks in it. Didn’t look great and the birds loved it. The pedestal had a nice classic shape but the plastic bowl made it ugly.

process, Bird Bath Helen and Will Bushell summerhouseart.com

With this wonderful haul of pottery we both decided to renovate the old ugly birdbath. We started by applying a mosaic of the pottery onto the pedestal. Now I must mention that the real beauty of beach pottery is its smoothness. And to preserve that smoothness, it’s really best not to cut the pieces at all. So each piece has to be searched for, each piece must fit without cutting it to fit. It takes more time but is worth it, just for the fun of being able to slide your hands over the finished mosaic and take in the feel of pottery that’s been tumbled in the ocean for years and years.

And we took our time, working on the sunny summer afternoons, playing rock and jazz on the CD player and taking lots of tea breaks with tea brought out on a favourite mosaic tray.

Mosaic Tray Helen Bushell summerhouseart.com

Once the pedestal was finished we had to think about how to make a basin. Luckily we’d found a perfect glass light fixture at a garage sale and proceeded to use that as a mold for the basin.

process, Bird Bath Helen and Will Bushell summerhouseart.com

If you look at the pedestal you will notice that we were going to have to devise a way for the basin to fit over the round projection on its top. And of course we came up with a simple, and I thought, clever solution. Bill cut a round of wood that was the same size as the projection and we built the cement around it as in the little diagram.

process, Bird Bath Helen and Will Bushell summerhouseart.comprocess, Bird Bath Helen and Will Bushell summerhouseart.com

It worked really well. We did have to chisel the glass fixture out the cement but it all worked out.

So next we started to cover the bowl with mosaic. First under the bowl and then the inside of the bowl. Around this time, Callie, our neighbour’s kitten decided to take an interest. She loved to jump on our work table and investigate. She especially liked to push pieces off the table onto the ground. And when she got tired she curled up in an old colander that we’d used to clean pottery. She’s a little character and had us laughing with her antics.

in process Beach Pottery Bird Bath Helen and Will Bushell summerhouseart.comCallie-in-collanderwm

Then finally, we were ready to grout. We did the basin first. We were really pleased with the inside of the bowl and how the undulating lines created with the ridges of the pottery created a great pattern.

process, Bird Bath Helen and Will Bushell summerhouseart.com

One of the things you have to get used to with mosaic is how different it will look with grout. Sometimes I find it a bit disappointing, and have to get used to the look. Here you can see the how the grouted bowl looks against the still ungrouted pedestal. In the end though, I liked the grouted look and actually love how the use of the dark grey-blue grout set off the pieces.

process, Bird Bath Helen and Will Bushell summerhouseart.com

And then, the final photo, the finished bird bath. We love it and this time it only took the birds one day to use it once we put it in place after it had cured.

Beach Pottery Bird Bath Helen and Will Bushell summerhouseart.com
The new Birdbath

Beach Pottery Bird Bath Helen and Will Bushell summerhouseart.com

And just for fun, every day, as we finished up for the day, we’d take a little movie of the progress. Bill spent some fun time learning how to stitch it altogether into a little video. And then thanks to Kevin McLeod’s music, we posted it on youtube. Ok, it’s a little bumpy and handmade looking but that’s ok. It’s just like the Bird Bath. Hope you enjoy…..

Share

Low Tide and a Haul of Pottery Shards


Horizon with Mt Baker, Sidney BC photo summerhouseart.com


Bill has gotten into the habit lately of taking long walks by the ocean and he noticed that the tide was getting unusually low. Which of course tripped off the idea that if the tide was low in Victoria it would be the same in Sidney. And sure enough, we found that there would be an all time low tide on March 31. Easter Sunday. The lowest at 1:30 pm! And immediately set about a plan of being there to find beach pottery.

I worried, I fumed, I wondered would we be too late? There had been other low tides but at later times, times we couldn’t get there. Had all the pottery been picked clean? On the day I got us up early, Bill protesting that we had until 1:30pm. I said no I have to be there early, as it’s going out, to be there to find what I need. I had mosaic projects in mind, I needed pottery.

The day arrived, sunny, warm, breezy, it could not have been more perfect. The tide is usually much higher than the next shot. And we were able to get into corners and areas that are usually covered by water.


Low Tide, Sidney BC photo summerhouseart.com

And what did I find? A beach full of pottery.

Beautiful pottery, in among the beach pebbles and beach glass, lying in the seaweed, ignored by everyone.

Low Tide, Sidney BC photo summerhouseart.com


Low Tide, Sidney BC photo summerhouseart.com


All the others searching that day were only looking for small perfect bits of beach glass in hard to find colors, or tiny,tiny bits of pottery that had a pattern on them also hard to find. But us, we love what everyone else seems to overlook. The warm whites and creams of larger pieces, the curve of the underside of the plate or saucer, the speckled surface, the bit of a cup handle, or even the remnants of a spark plug.


Beach Pottery Shards from Sidney BC, summerhouseart.com


The day was perfect, blue sky, the tide slowly going out. We took our time, enjoying every second.

Taking our best recycled basmatti rice bags to the beach we set about collecting. We took breaks from our bent over searching and sat, totally relaxed, faces to the sun, taking in the sounds of seagulls, breathing in the smells of ocean and seaweed.  We gazed at Mt. Baker, its snowy peak framed by poles set in the ocean, perches for squawking seagulls. Then back to collecting. And oh,what a lovely haul.


Beach Pottery Shards from Sidney BC, summerhouseart.com

Soon to be maybe another birdbath or column in garden. Or another mosaic frame.

Beach Glass and Beach Pottery Bird Bath by Helen and Will Bushell, summerhouseart.com


Beach Pottery Mosaic Mirror by Helen Bushell, summerhouseart.com

But the loveliest thing is the feel of beach pottery, it’s warmth, its smoothness. If you use the pieces as we do, only fitting and arranging without ever cutting them, you can run your fingertips over the smooth surface of a finished mosaic and feel the gentle curves that have been tumbled for a hundred years in the ocean.


Share

A Serendipitous Mosaic Bird Bath

Or how we made a bird bath from this, an old chimney pot,

process, Beach Pottery birdbath by Helen and Will Bushell summerhouseart.com

and this, a big heavy glass ceiling fixture which we used as the mold for a cement basin

process, Beach Pottery birdbath by Helen and Will Bushell summerhouseart.com

And how all of that became this: our Beach Pottery and Beach Glass Mosiac Bird Bath

 Beach Pottery birdbath by Helen and Will Bushell summerhouseart.com

So this is the story of our Serendipitous Bird Bath, which took us over a year, what with health problems, other work and whatever, to finish.

The serendipity all started with a lucky garage sale find of the Chimney pot, above.

We immediately saw it not as a chimney pot but as a base for a bird bath. Didn’t have a top in mind yet, but we had the base. And I already knew that the base would be covered in a mosaic of beautiful smooth beach pottery with lovely beach glass inside the basin. Because as everyone knows, beach glass only looks good when it’s wet!

Of course this meant we had to go and get some beach pottery and glass but that was fun and easy. A drive up the peninsula to Sidney and the beach at the end of Beacon Ave there. A few happy hours beachcombing for shards of ocean tumbled glass and pottery. And as we do this enough, we did have a rather good stash of the stuff.

So we dove right in and covered the base in lovely, smooth beach pottery.process, Beach Pottery birdbath by Helen and Will Bushell summerhouseart.com
Here’s a close up of some of the pieces as they were being applied. The masking tape is hold some of the heavier pieces in place until the mortar sets. Since this will be outside in all weathers, the pieces are affixed with a stiff mortar mix. The method by the way has already been covered in a past and popular post on how to make stepping stones Helen’s way.

Of course we still were not sure about the basin and were thinking up ideas for something to cast, when serendipity happened again. On another garage sailing trip, we found this rather large and heavy piece of glass meant to be a huge ceiling light fixture. We got it for about $5.

process, Beach Pottery birdbath by Helen and Will Bushell summerhouseart.com

Now you may think we used the glass fixture as a top but  it wouldn’t have been strong enough or able to survive cold winters without cracking and breaking. No, we used it as the mold for a cast in cement for the birdbath basin.

Here is the glass fixtures covered in a garbage bag, ready to be the form for our cement bird bath basin.

process, Beach Pottery birdbath by Helen and Will Bushell summerhouseart.com

We mixed up the cement and added fiberglass fibres to give it strength.

process, Beach Pottery birdbath by Helen and Will Bushell summerhouseart.com

process, Beach Pottery birdbath by Helen and Will Bushell summerhouseart.com

Here it is after the glass fixture and garbage bag are removed. I’m still trying to decide what to do with the glass ceiling fixture, maybe it may find itself covered in stained glass one day…..who knows. Ideas are percolating.

process, Beach Pottery birdbath by Helen and Will Bushell summerhouseart.com

The underside was also covered in beach pottery, except for a circular area in the middle that was left without mosaic. That was left to create a place for the top to fit over the column.   Which left the inside of the basin to do. That actually sat on our kitchen table for ages while we tried to find time and energy to start on it. Not to mention decide on the design. Luckily we’re pretty used to using our kitchen table for everything else but supper and are quite happy eating supper on the couch in front of a movie borrowed from the library. The whole house is pretty well studio space, everything has to have flexibility. Anyway, by November, Christmas was looming  with the attendant big dinner so the push was on to finish the basin.

process, Beach Pottery and Beach Glass birdbath by Helen and Will Bushell summerhouseart.com

A spiral pattern emerged.  And a couple of close up shots of how I arranged the edges with curved bits of beach glass.

detail, Beach Pottery and Beach Glass birdbath by Helen and Will Bushell summerhouseart.com

process, Beach Pottery and Beach Glass birdbath by Helen and Will Bushell summerhouseart.com

We used a white mortar to fix the glass to the cement. I’ve often had students ask me if they can use beach glass in a mosaic. I always discourage it. Here’s why. On the left beach glass as it is. On the right, beach glass sprayed with water. As I said earlier it really only looks good wet. Plus the other problem is that it is very pitted and the grout sits in it. You have to be prepared for that look.

process, Beach Pottery and Beach Glass birdbath by Helen and Will Bushell summerhouseart.com

And finally, more than a year from the time we started it, we finally got around to grouting both pieces.

Of course I set up the table with a tray of tea and cups ready for our breaks. I knew it was going to be a long day with a real need to take a few breaks to rest our backs and hands as we grouted and then had to clean grout off each bit of pottery shard and beach glass. If you look closely, you’ll see that we left a space on the underside with out mosaic where the basin fit over the base.

process, Beach Pottery and Beach Glass birdbath by Helen and Will Bushell summerhouseart.com

All worth we think. Here it is finally set up, from above.

 Beach Pottery and Beach Glass birdbath by Helen and Will Bushell summerhouseart.com

From the side

 Beach Pottery and Beach Glass birdbath by Helen and Will Bushell summerhouseart.com

and here is the basin from above filled with water, just what the beach glass needed to shine. Still waiting for the birds to appreciate all our work. But enjoying it all the same.  Update October 22:  A Robin was seen having a good old splish splash bath just a few weeks ago and now all the garden birds are enjoying it too.  We’re both happy that it’s been accepted and enjoyed.

 Beach Pottery and Beach Glass birdbath by Helen and Will Bushell summerhouseart.com

(BTW, if you’d like to make a comment, just click on the title.  It’ll take you to comments….and we do appreciate comments )

Save

Share

Introducing the Students of My 2010 Pique Assiette Mosaics Classes!

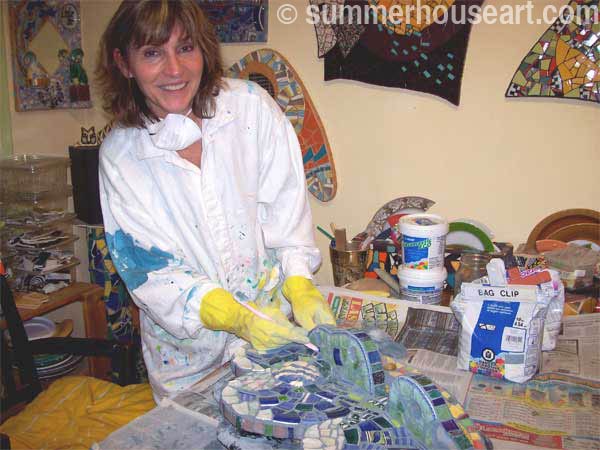
My mosaic classes are probably a bit unusual. For one, they are very small. I only have only one or two students at a time, three in a pinch. I teach in my own studio and it’s not very big. I may have 4 to 6 students over a whole summer, and usually teach them one at a time.

The next thing that’s different is that I ask the students to each come up with their own unique project, something that means something to them, something they may have been dreaming of doing. I never set a project for anyone, they set their own.  The beauty of this approach is that I never know what will happen or what they will create and it’s quite wonderful.

The last is that my classes are 4 evenings or afternoons over 4 weeks, with lots of time to wonder and create. They aren’t a short workshop over a couple of days. I like to have lots of time for sharing creative ideas and mostly I want it to be an experience that gives my students time to have some fun and go slowly and ponder each piece. After all, mosaic is a slow art.

I have very few students, this year actually fewer than usual. But, I like the fact that my classes are flexible, they can accommodate things that happen, postponements caused by illness or family matters that can’t wait. We often work around all of this and this year was not an exception. The first two students I’m introducing had such problems and their projects spanned a good few months. But the results were worth the wait.

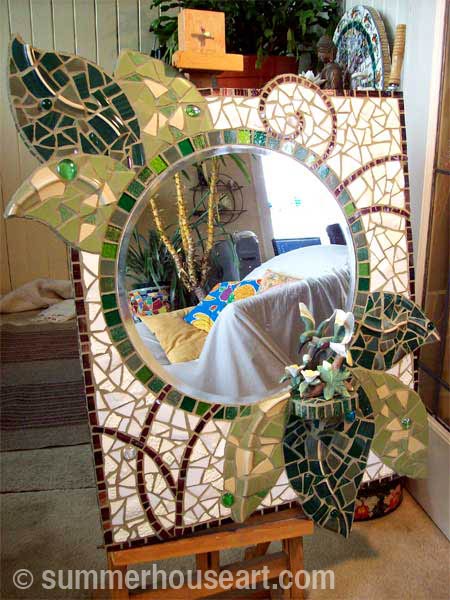
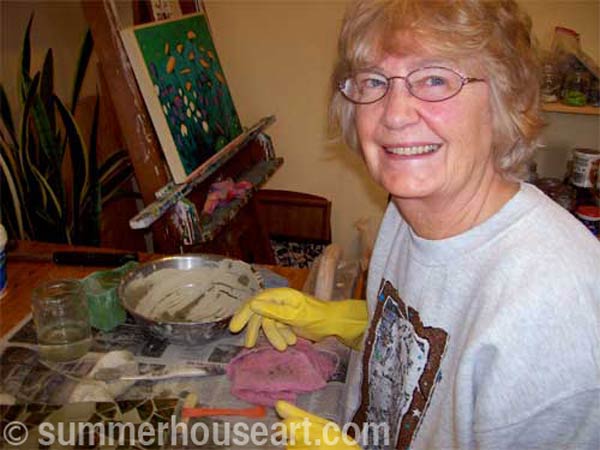
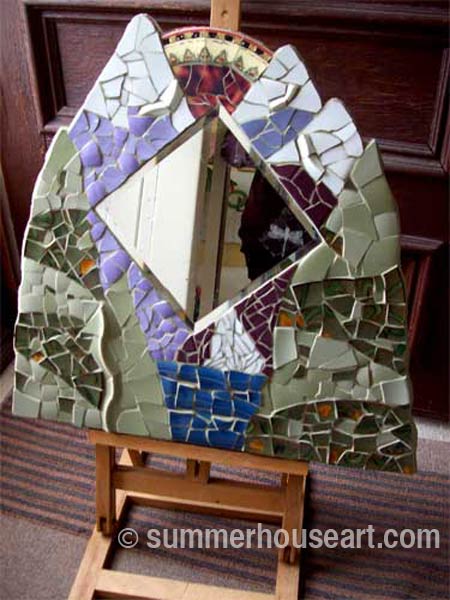
Fern Often someone comes to me with an idea already drawn out, a dream project, something that has been niggling at them and waiting to be made real. This was Fern. The idea was there and when we jumped into her van to cruise thrift shops in the first shopping class, serendipity was at work and she found everything she needed to create her mirror. Bill and I threw in a few ideas for approval and the project was started. That was in July 2009.

Student Fern at Summerhouse Art mosaic class

In between came illness, a move and long stretches where she couldn’t work. But, we kept in touch by email and I always knew she would finish it. And, finally, this year in January, the time came for the grouting.

The mirror was worth the wait. Fern was a natural mosaic artist, pieces fit beautifully. Plus, she had found the most wonderful brownish-purple glass tile on the net to augment the design on the front spirals and around the edges. It’s a quietly classical and beautiful mosaic complete with hummingbirds.

Student Fern's finished mirror Summerhouse Art mosaic class

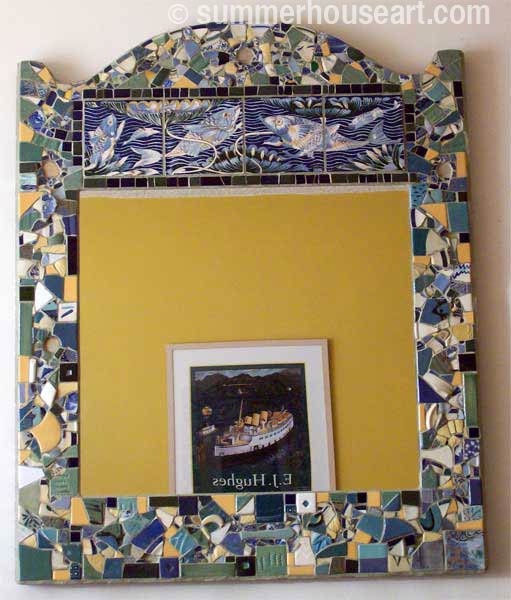
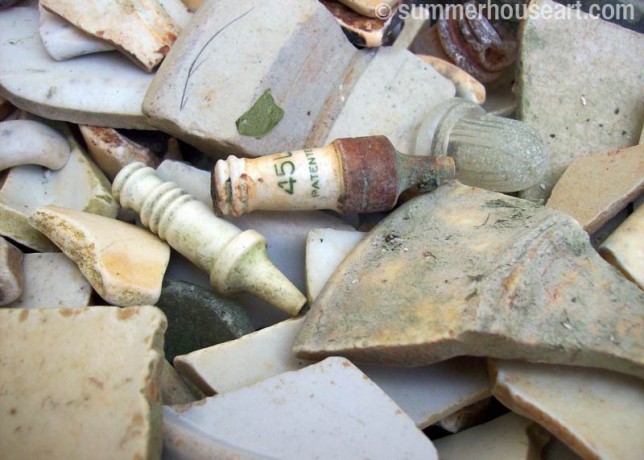
Marianne was another with a treasured idea, and had all the pieces for it, saved for years. She loved the four reproduction tiles by William de Morgan she had found years ago. Plus she had a huge collection of beach pottery shards. When I saw them I agreed with her that they would make the most wonderful pairing ever. We didn’t even bother with the shopping class and spent the first class creating the design of the large mirror support that would be needed to have the proportions work out. Now, I normally discourage large first projects. I don’t want a new student to burn out and get overwhelmed and then end up hating mosaics. But Marianne was not to be dissuaded and assured me that there would be no stopping her.

Student Marianne Summerhouse Art mosaic class

Because of its size we decided to have all the classes in her apartment overlooking the ocean view. Lovely, I really enjoyed that view, even with my fear of heights. But, the project was slowed by her suddenly having to go away to take care of her elderly mum. When that was taken care of, Marianne, who had her own health problems too, still soldiered on with a few visits from Bill and I to see the progress and enjoy tea and goodies. Finally, the time came for grouting, the exact color picked for grout and the three of us went at the grouting, working hard. The result? Well, as you can see, it was perfect! The gorgeous tiles were set off beautifully by the mixture of very carefully placed pottery beach shards.
Student Marianne's finished mirror, Summerhouse Art classes
Anne had a lot of experience with other crafts and was wanting to try mosaics. The shopping class yielded quite a few choice dishes and Anne went off home to ponder a design. She came up with a landscape of mountains, trees and a waterfall.

Student Anne Summerhouse Art mosaic class

When it comes to design I always try to encourage each person to go with the feel of it. I’m a big believer that we all have our own intuitive sense of composition. We worked together on this in the class and then Anne, led by her own “feel” for what looked best, would adjust, rearrange and create what would ultimately work well for her. The finished piece was lovely and serene, with a bit of influence from Emily Carr’s trees and quiet gradations of tone in the colors.
Student Ann's mirror Summerhouse Art mosaic class

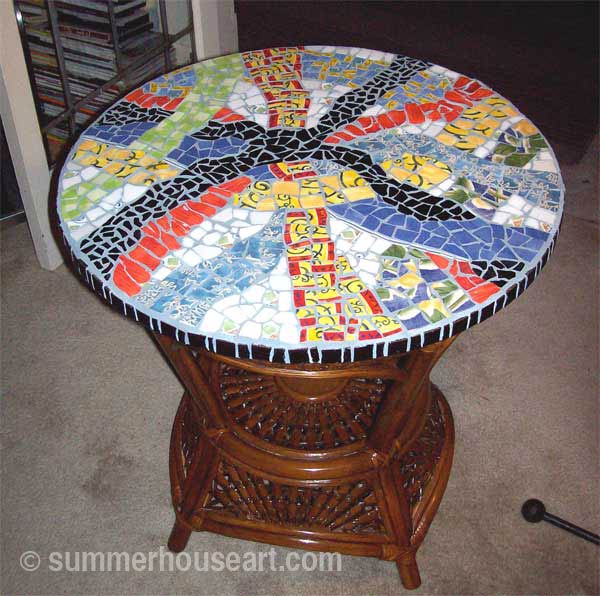
Della sparks with energy. She’s always busy, always learning new things and has a background in quilting. Quilters, I’ve found, seem to take to mosaics like ducks to water. Della was no exception. Plus, as she said many times, she was into the “drama”. By that she meant, lots of color, lots of movement. She wanted to do a table top and had brought with her a patio table for which she wanted to create a new top.

Student Della mosaic, Summerhouse Art mosaic class

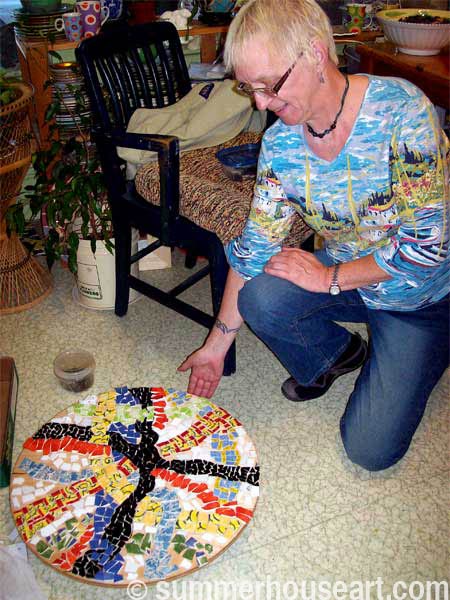
Well, when we had finished with creating the design of rivers of various surfaces, overlapping and crossing the table top it looked so good that she had to find an even better table to put it on. And she found it! The whole finished table with it’s dramatic top was absolutely meant to be and gorgeous! And soooo dramatic, don’t you think?

Student Della's table Summerhouse Art mosaic class

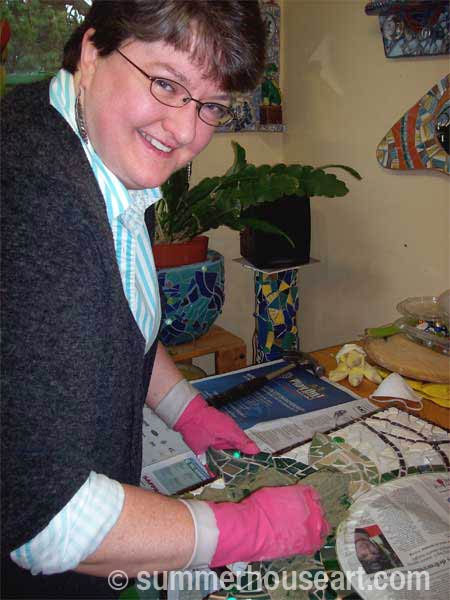
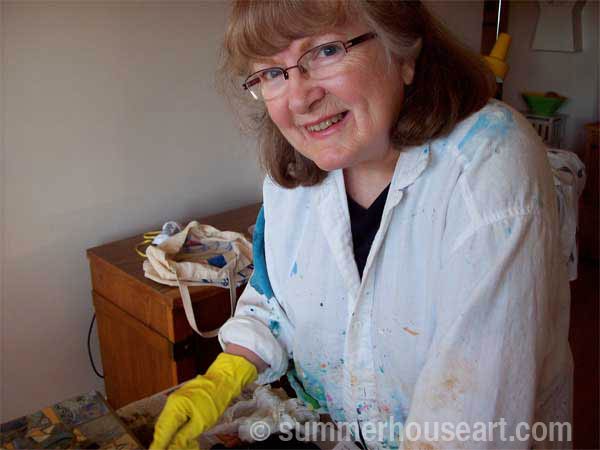
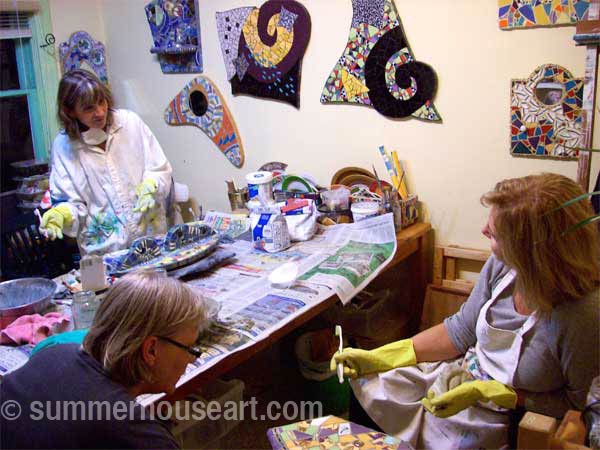
Susan and Nancy, good friends, took the class together. Here we all are in my studio working.  I did tell you it was a small studio, didn’t I?

Studio mosaic class, Summerhouse Art class
At the first class, Susan had an idea ready, sketched out and was ready to roll. The shopping class just had her finding so much good stuff that we had to spend a bit of time fine tuning and putting things back before checking out.

Student Susan, Summerhouse Art mosaic class

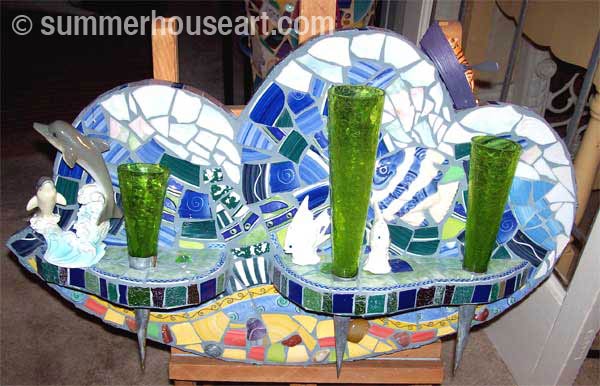
Her rolling waves and ocean bottom wall piece that was made to set off the candle holders (a gift from a sister), was a rollicking and exuberant bit of mosaic work. It even has a reference to the book The Life of Pi with a tiger in a row boat on top of one of the waves!  You can just see it, still unglued, on top of the second wave. I basically left Susan to do as she wanted, just giving little bits of direction now and then. With some people, you just let them go with it. And it worked out very well I’d say.

Student Susan's mosaic, Summerhouse Art Mosaic class
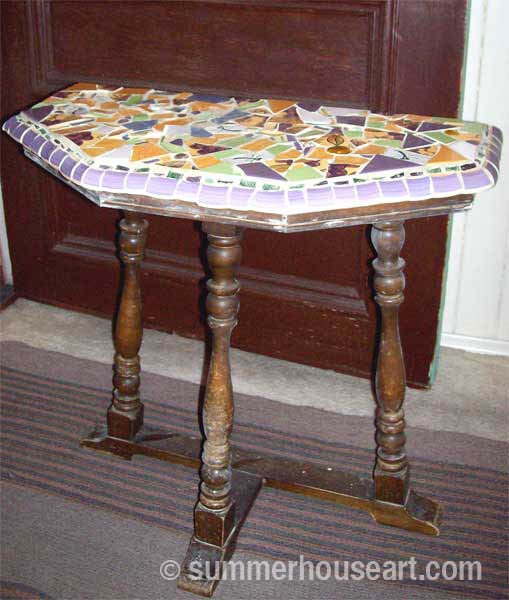
Nancy came to the class ready to mosaic but without any fixed ideas or plans. I assured her that very often students find just the thing at the shopping class. And that’s exactly what happened. After finding lots of dishes that appealed to her, we found the most wonderful little table crying out for some mosaic just before heading for the cash register in the thrift shop.

Student Nancy, Summerhouse Art mosaic class

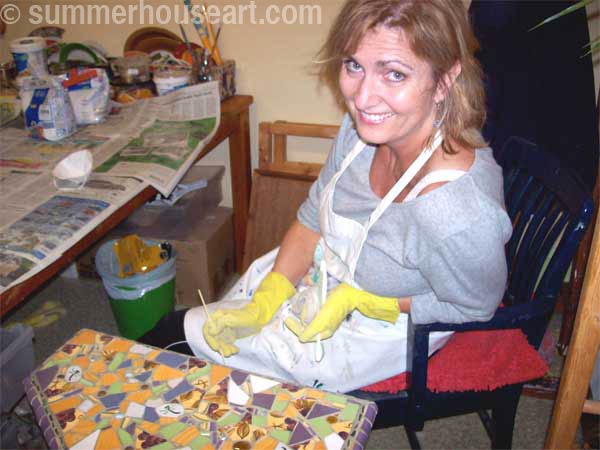
I always tell students there is only one rule when shopping and that is only buy what you really like. And all of those dishes in colors and patterns that Nancy liked looked great when collaged together on the table top. It really looks beautiful, as though it was always meant to be this way.

Student Nancy's table, Summerhouse Art mosaic class

I think this years students were amazingly talented and really worked hard to create their lovely mosaics.  Now my only hope is that this will spark even more mosaics in their futures.  I just love getting people hooked on this most addictive art form.  Bravo everyone!

Share

A Study in Contrast or How I Created Two Very Different Mosaics from the Same Shards

detail, Pale Beach Pottery mirror by Helen Bushell, summerhouseart.com

A month ago, picking through all my bits of ocean tumbled pottery, I’d started a new pique assiette mosaic mirror. You would think that picking bits from the exact same basin of shards, I would come up with almost the exact same mirror frame that I’d created back in January. That was when I’d first started experimenting with these smooth, aged and beach sanded shards.

Beach Pottery shards, summerhouseart.com

And maybe, I might have. But as I was arranging shards, I found myself attracted to the lighter pieces, the undersides of plates, the curves and how they created a pattern and a movement.

Stealing time here and there from other things, I finally got to the stage of grouting last Friday. And accompanied by the soundtrack to “Monsoon Wedding” CD, ( another lucky garage sale find), mixed up a a couple of different grouts until I got a shade to my liking and grouted it up. BTW, if you have never seen Monsoon Wedding I’d highly recommend it. The movie is colorful, lively and has great music…..but at the end, for all of us mosaic lovers, there is a wedding scene in a mosaic covered grotto. I just kept playing that scene over and over trying to take in the mosaics. And yes that is an old toothbrush, that I’m using to clean off grout. And you thought there wasn’t another use for them.

grouting, Pale Beach Pottery mirror by Helen Bushell, summerhouseart.com

I was struck by the contrasting frames that I’d created with almost the same ingredients. All the result of my choices from the pool of shards. I couldn’t resist hanging them side by side to enjoy the contrast. The first mirror is a collage of all of the rusty and patterned pieces. The second mirror frame is a quiet, almost monochromatic arrangement, with the movement created by the curves as the central theme.

 Pattern and Pale Beach Pottery mirrors by Helen Bushell, summerhouseart.com

Of course, I did add a few little detailed pieces to break up the surface and add interest. In the header of this post, if you look carefully, you will find the tiniest little blue heart. In this corner you will find the few special bits I loved and a found space for, like the floral shard of some long ago shattered tea cup or a remnant of the  manufacturers mark on the bottom of the dish.

detail, Pale Beach Pottery mirror by Helen Bushell, summerhouseart.com

And here it is, up close and personal, on a more pleasing background to highlight it’s quiet colors. I’m quite happy with it. It’s a bit of a departure for me too, the artist who likes bright and gaudy, don’t you think?

Pale Beach Pottery mirror by Helen Bushell, summerhouseart.com

Share

Inspiration, Pique Assiette Mosaics and A Quote by Picasso

Picasso quote on studio door, summerhouseart.com

I found this quote the other day in my internet wanderings and immediately copied it and attached it to my studio door. A little reminder to find some time, no let me rephrase that, make some time to let inspiration find me working. My time is so precious, there is just not enough of it and sometimes I feel like I squander it. Oh, I really do need, somehow, to find a way to do it all, all the things I need and want to do.

Right now I’ve got all my bits of ocean tumbled pottery spread out on what little space is left on my studio work table. I’m creating a new mosaic with them.  The first mirror I made with them is in a previous post, The Beach Shard Pottery Experiment.   The plants are crowding out the work space because I had to move them to the table, so I could put the starter seeds in the window instead, but that’s another story and another place I’ve spent my time.

in progress, Pattern Beach Pottery mosaic Helen Bushell, summerhouseart.com

But I have made some time, put some music on and started to move the bits around to find the right composition. At first, I looked for the odd bits with pattern on them and made them the focus.
in progress, Pattern Beach Pottery mosaic Helen Bushell, summerhouseart.comLater I realized that I was enjoying the off white bits, the bits that had curves of the plate rims on them and started to see that I could use them as the focus and create an interesting surface with those.

in progress, Pattern Beach Pottery mosaic Helen Bushell, summerhouseart.com

I’m trying to create a sense of movement with these curves.

in progress, Pattern Beach Pottery mosaic Helen Bushell, summerhouseart.com

So there it is, that’s as far as I got. Only a little time and then I went off to help with Easter dinner and make a Rhubarb Cobbler with fresh spring rhubarb from the garden. Delicious, by the way. My mosaic will have to wait for me, but I will get back to it, now that inspiration has found me working.

If you find mosaics intriguing I hope you’ll spend a little time yourself on my posts about my pique assiette mosaics.

Share