More Student Mosaics, These in Delicate Blues

I often ask students of my mosaic classes when the pieces are done, if they would mind if I shared their work on my blog. And sometimes they’re quite happy to share. Like the two students I had just recently, both busy moms, who managed to fit in the classes as a morning out. Jillian and her sister-in-law, Shannon, were so much fun to work with.

My studio is very small so, of course, I only have very small classes, two students, tops . I teach a type of mosaic called Pique Assiette, which is done with broken dishes and lots of bits and pieces, even ornaments sometimes. Although I often teach just one student at a time, I have found over the years that encouraging friends to take the class together is much more fun for everyone. No stress, just friends enjoying learning something new and having a good time.

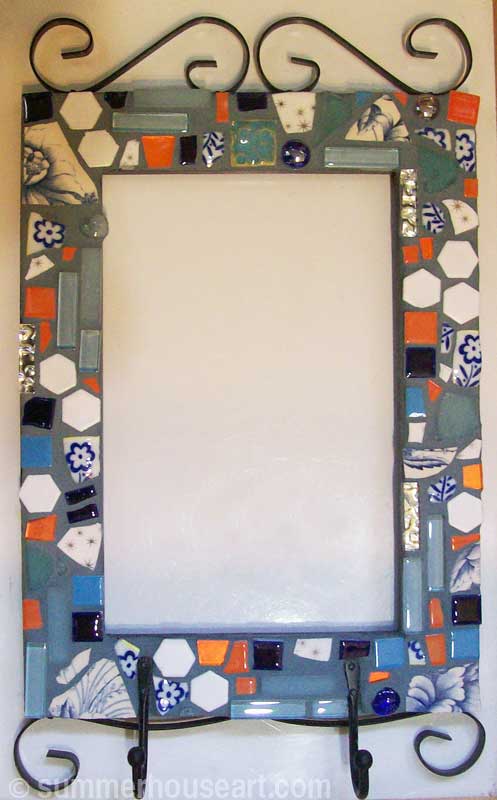
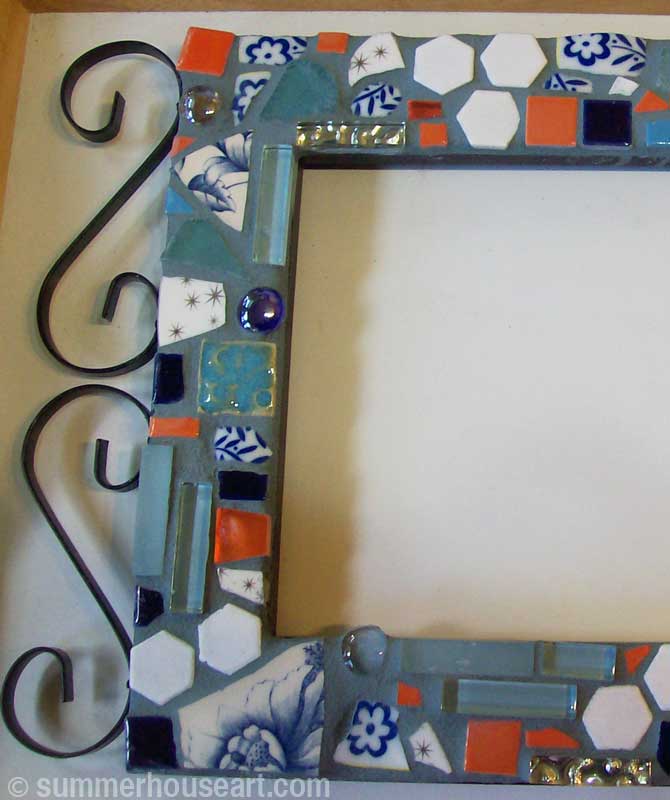
Their shopping class yielded not only some nice dishes but also the bases for their mosaics. Shannon found a frame that she will fill in with a blackboard later and use for a notice board at home. She included bits of tile from a home renovation and also some dishes with blue and white designs.

Shannon's-mosaic-2wm

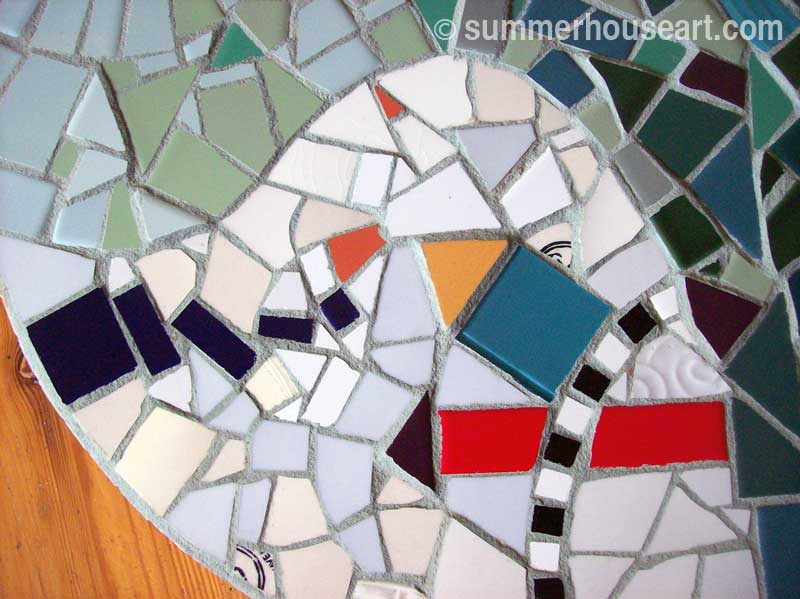
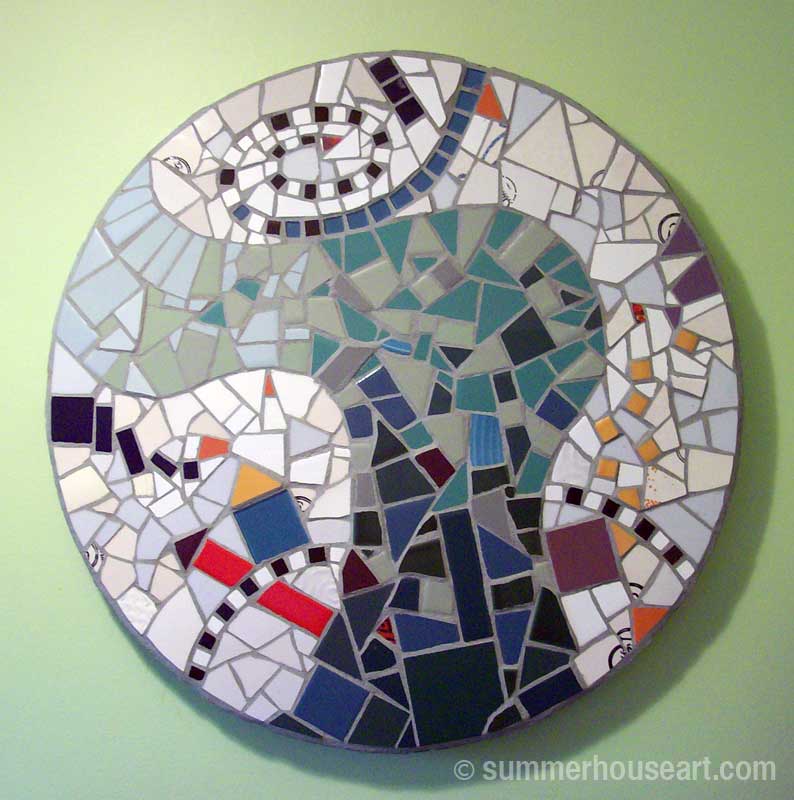
As you can see, in this close up, the result works beautifully.

shannon-mosaic-clswm

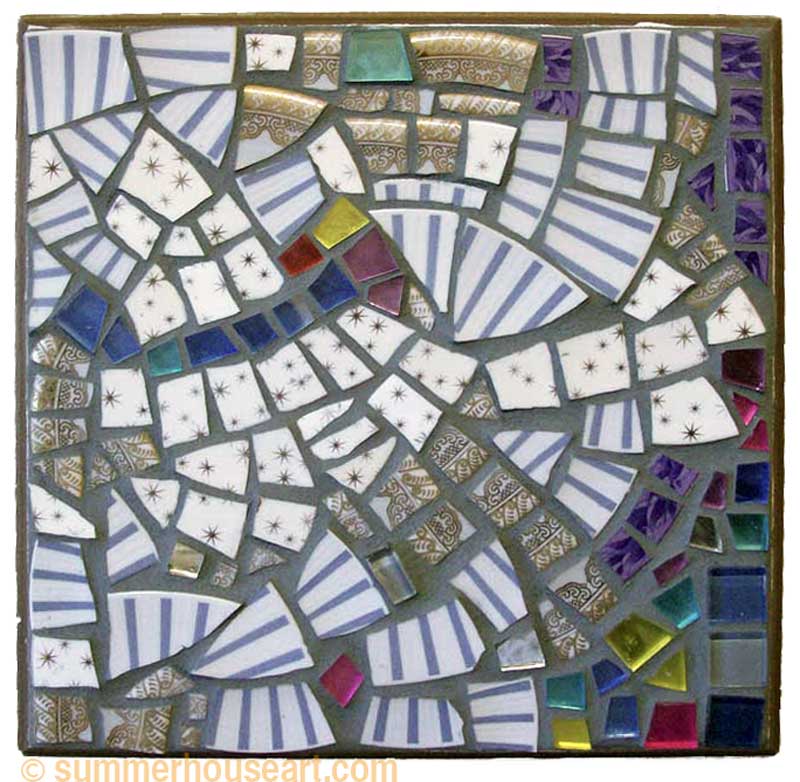
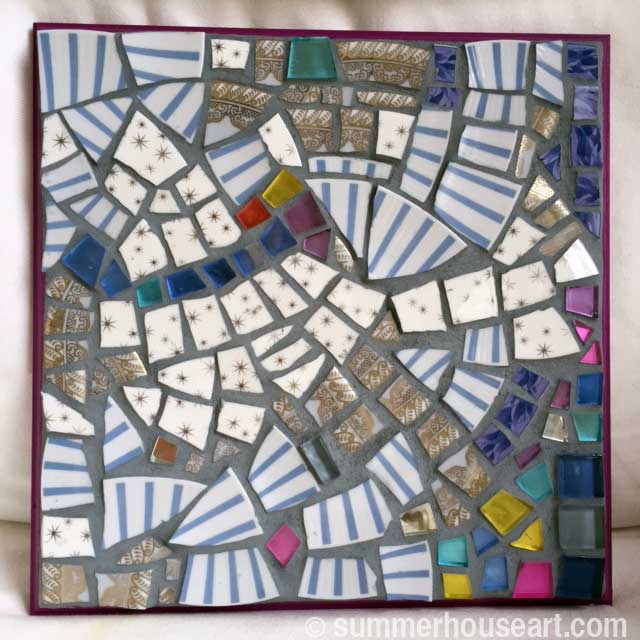
And Jillian found one of those beveled boards that when the picture on it was painted out, became a good base for this gorgeous little abstract. Her mosaic was made from a mixture of striped dishes and dishes with delicate pattern as well as some plastic tiles from a craft shop. The composition, very intuitive, works very well too. After a bit of light blue grout, to tie it all together, we were all very pleased. The results were stunning and I’m sure these Pique Assiette Mosiac pieces will add a wonderful personal touch their homes.   Later, Jillian painted the edge a lovely magenta which brought out the color in the mosaic.

Jillian's-mosaic

JIllian's finished mosaic

Share

The First of Will’s Mosaic Table/Wall Pieces

It occurred to me one day recently, that although I have header photos on the blog that feature two of Will’s mosaic tables, I’ve never actually done a post about them. In fact, there are quite a few pieces of his and many of mine, that have, as yet, never been written about.

In some cases, I’ve been saving my pieces until I had a series. More about those, another day. And with Will’s tables, maybe I just felt like I wasn’t the one to be writing about them. And of course, there have been so many distractions, new projects, health things, whatever, to put off writing about and featuring some of our work. Ah, well, never mind, I’ve decided to feature one of his tables today. It’s a start, of sorts. This table is made from a mixture of tile and broken dishes in the picassiette or pique assiette style (apparently there are two versions of the spellings).

Green table-top-view

We sometimes call this table the “Green River” mosaic, a reference to the meandering flow of green tiles that moves from dark shades of greens to lighter shades, a flow that snakes its way across the piece. But it is in no way a landscape, but more of an abstract design.

Will started with the shape of green, then intuitively filled in the remaining space, much as he would a drawing or painting. Simple arches and spirals of black, white and turquoise tile draw the eye over the ground of varying shades of white punctuated with flashes of red.

turquoise-glass-arcwm spiral-cls-upwm purple,-orange-spotswm red-arrowwm

The piece functions as a table top when laid on its rattan basket which forms the table base. And when we don’t have room for a table, the basket is stored and the piece works beautifully as a mosaic wall hanging. I never seem to tire of looking at it, taking in the little details, letting my eye move with the flow it creates. To me it is the magic of mosaic combined with Will’s drawing sensibility to create a very lyrical artwork.

table-side-viewwmMosaic-wall-piecewm

Share

Christmas Pared Down Just a Little Bit

Every year I try to have some fun with the Christmas décor. Make a few little changes, tweaks, and sometimes something entirely different. This year we’re going for the latter. Usually, about a week before Christmas we go down to the basement and bring up the tree and all the decorations and pretty well put up every single piece of décor we’ve got, somewhere.  And we do have a lot of decor.  As I’ve written before about our Abundant Christmases, you can collect a lot if everything is secondhand!  This year we decided to pare it down just a little bit.

Christmas Bird Cage

This year I happened to have a tall bamboo birdcage out in the corner of the living room. When the season rolled around enough people had suggested we decorate it that we decided, why not?

cage-detailwm

We dropped some lights inside it and decorated with lots of tiny and mid size vintage glass balls. With some birds on top and a bit of mistletoe for greenery it looks quite festive.

cage-closerwm

And of course, this year I did put out my Santa collection, but that too ended up just a bit pared down. Couldn’t leave out the Grumpy Santas

grumpieswmOr the Gumby ones and a few other odd but happy ones.

santa-groupwm

So there it is. Almost all the decorating is done. Ok, the mistletoe may be replaced with some other greenery on top of the new “tree”. It will probably be put in the doorway, still needing some greenery, in order to catch a quick kiss from those coming in the door.

Now to do Baking! But even there, for once, I think I’ll cut back too. The mince tarts for sure and maybe some cookies, but all in all maybe I’ll spend more time in my studio than the kitchen this year.

And the ChrisMoose, a hand made gift many years ago from Will’s mum, will always be up for Christmas, just to remember her by.

 We hope everyone has the Best Christmas Ever!!

chrismoosewm


Save

Share

Creating Strip Quilted Cozies with Men’s Striped Shirts

fabric-up-closewm

Ok, I admit it, I do like stripes. I like it in fabric, in drawings, whatever. I recalled seeing some quilts done in men’s shirt fabric and really liked the look created when doing strip quilting.

Luckily, when it came time to create a new tea cosy, it just happened that I had a couple of striped shirts that Will didn’t want anymore in my fabric stash. Then, in a recent shopping trip to the Thrift store, I lucked out finding a striking red and yellow striped blouse.

Next, it was just setting some time aside to create some strips of stripes going every which way and basically, sewing them together creatively.  And I do mean creatively, not accurately, since I tend to be a bit of a slap dash sewer. But I just happen to like that look, so it’s ok.

strips-sewnwm

I figured, since Will has recently gotten himself a coffee press, might as well make a coffee cosy too. I think we’re both pretty happy with the results.  And yes, that is Queen Victoria poking out behind the tea cosy.  Well, the Brits do like tea, so where else would you put her?

coffee-cosywmtea-cosywm

Share

Showing off some Student Mosaics

Every now and then, it’s nice to show off the work done by the students who take my mosaic classes. Shelley, who had always wanted to do something in mosaic, brought along her friend Vicki. Both were a lot of fun to teach and said they wouldn’t mind me showing their mosaics on my blog.

Although neither of them had a definite project in mind, they were ready to try anything. The type of mosaic I teach is Pique Assiette, basically made from thrift dishes. The shopping class was where they found their projects. Both found wicker tables that just needed Will to cut out a plywood top for.

Shelley’s Mosaic Table

Shelley found lots of floral dishes that were in colors that all worked well together, but worried that it would all look too busy. Vicki, on the other hand, wasn’t sure about a few black plates with white stripes found in the Bibles for Missions Thrift store. As luck would have it, she then found some great old vintage dishes at home in green. And somehow, as I assured them it would, all of it came together beautifully.

Shelley’s colors and flowers when mixed together with floral bits and solid colors created an overall summery pattern and Vicki’s white striped plates totally worked perfectly and echoed the white wicker table she found.

Mosaic has a way of doing that.

Vicki's Mosaic Table
Vicki’s Mosaic Table


Share

We have a new online shop!

new-prancer-tileWe’ve just opened up a shop of our designs on Zazzle, which is a great service out of California. They offer really good quality products and we’re kind of excited to get our work out there.

kitty-dreams2


xmas-stars-tile

Posted now are just a few Christmas items, with our original designs on cards and ornaments.  We’re planning to add more items to our gallery as we go along.  So if you’re looking for something fun and a bit unusual, you might find it here.  We’d also love to hear your comments.  BTW our watermark won’t show on our cards, that’s just so you’ll be able to find us on Pinterest and anywhere else these images end up online.

Share

A Deco Style Magazine Table Gets a Facelift

Roxy-beforewmRoxy-front-3quarterwmThis little magazine table with its waterfall top and deco style handle grabbed our attention at a garage sale. It was a bit worse for wear and looked like someone had tried to refurbish it and given up.

But we saw possibilities and quickly scooped it up and stowed it away in our little station wagon. You can’t beat a small station wagon for garage sailing. Just fold those seats down and you’ve got lots of room for hauling all sorts of good stuff home.

Roxy-sidewm
In fact, speaking of cars, the style of the table brought to mind cars of the 50’s, some with two colors. Lovely rounded cars with curved chrome details, in colors like two tones of green or maybe black and pink. Whatever happened to painting cars with two tones? So much more interesting to look at than all these gray cars you see. Our car is gray and I keep looking at it and wishing I could change it. But I digress. Back to the little table.

Roxy-door-detailwm

Will liked the two tone paint idea and chose a lovely soft almost mint green and black. The body became the mint green. The magazine holders and the contrasting veneer on the top, he painted black.

And then, just to give it a bit more pizzaz, a touch of orange to echo the rounded elements. And now that the little table had a whole new look, we gave it a new name too…. “Roxy”. Roxy will be featured on our online shop on Diggit right here in Victoria.

Roxy-front-door-openwm

Share

A Bedside Table, appropriately titled, “Night Flyer”

This little night table is next in our series of upcycled furniture pieces. As we’ve gone on our Saturday garage sailing travels this summer we’ve found some lovely bits of furniture.

Bits that we are slowly and carefully applying our version of artistry to. This little night table started out as a rather plain black night table.

Black side Table Before

Black side table transformed
Will wandered around it for some time, waiting to find out what to do with it, or as he said, what the table told him it wanted. Finally, he decided that it wanted to be black and white. So the stripes on the drawer appeared.

Black side striped drawer
From that point on, it became a 3D painting. And not just on the drawer front as on the Green Night Table. The whole table became a painting where collaged bits appeared, and sanding down to the old colors to bring out it’s history and a bit of texture too.

Black side table painted top

Black side table painted interior

I rather like what sanding brought out in the legs, myself. The final flourish was the black and white drawer pull, oversized but with a definite sense of humour.

Night Flyer Table drawer pull

And yes, it does have a title, also after long deliberation. It’s called “Night Flyer”. Appropriate, don’t you think, for a night table?  This table, along with other art furniture we’ve made is now listed for sale on Diggit, a local online sales site.

"Night Flyer" Table By Will Bushell
“Night Flyer” Table By Will Bushell


Share

How I arted up a Garden Gnome

Ok, I admit it.  I bought a garden gnome at a garage sale last summer.  Will shook his head, he could not believe I actually paid for it and brought it home.  It was, I must also admit, really awful.  Made out of resin which had cracked, the paint job on it was an attempt to repair a fading mess.  It was dirty and covered in pine needles.  And then it sat on our deck all winter because, although I meant to repaint, it I hadn’t decided quite how….yet.    Until today, when it all clicked, out of the blue or pink as you can see.

gnome-landscape

OK, I also admit that this inspired paint job was not without a bit of inspiration from another artist.    One in Italy, of all places, with a web site called The Good Machinery,  that I happened to see and of course, Pin, on Pinterest.  And what this artist did with little plastic toys was, I thought, pure genius.   Well I thought so…..

So here it is,  my garden gnome, inspired by,  but after all, totally reinvented and refurbished by me.  And it was fun too.  He did need something to hold and in another inspired moment, I fitted him with a solar garden light.  I think he’s going to fit right in.

gnome-close-up


Share

The Rescue of the Little Magazine Stand

I wish I had a “before” photo of this little magazine stand. Somehow, when I decided to start on it, taking photos was not on my mind. The table started out as a piece of furniture found at a garage sale, one of those projects people start, don’t finish and want to get out site.


The sides that held the magazines were missing, the table itself was stripped, badly. And there it sat, sort of forlorn really, almost waiting for a new start. We talk these days about “rescue dogs”, but that day I felt like I needed to rescue this little table. So I brought it home.

Magazine Table with mosaic top

The first thing I decided it needed was a mosaic on the top.  And luckily, Will made it so easy by routing out most of top to create an area to put mosaic in, so that it would be flush with the top.  I chose happy colors for the mosaic. 

Mosaic top detail

The next problem was to create new sides for holding the magazines. We looked up the styles, we pondered, we threw some ideas around, but none seemed to work.     Then one day I just happened to notice an old wall display shelf, one of those odd ones with little turned spindles between the shelves and we basically cut in half and created two whole new sides for the little table.

Side view

In fact the holes that the spindles went through originally, were added to, to become a design element of circles which we carried on with the round wooden feet, made from wooden balls found at a lumber store.

mosaic table with red drawer

Then it was just a matter of choosing colors. Black with punchy little red round feet just struck me as the answer. Which led to the little red balls on the ends of the new spindles to carry on the theme.

All in all, it has been rescued, reborn and re-created. It looks so much happier than that forlorn little table in the driveway. It almost needs a name. Will says, “How about CoCo? That’s sort of a round and happy name.” So CoCo it is. Now that it’s been rescued, it really needs a new home.  It’s now on our new shop on Diggit.

mosaic table front view


Share