Finding Connections While Experimenting with New Mediums

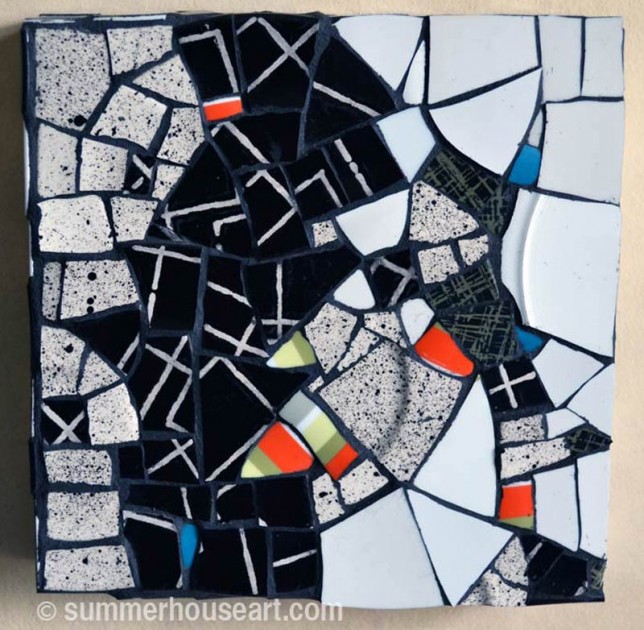
Experimenting with and immersing yourself in a new medium is always fun. For years I was cutting up dishes and making my way through learning the “how to” of mosaic. That lead from making some crazy wall pieces full of ornaments and pattern, to doing more and more work, in an abstract way, playing with the basics of colour and texture. I’d say the surfaces of mosaic still attract me, the glinting of china in the sun, against the dull grout acting as a foil.

"Speckle and Stripe" ,mosaic, by Helen Bushell, summerhouseart.com

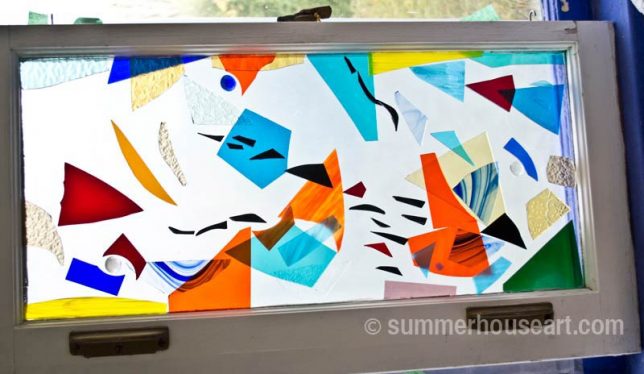
While still creating mosaic in a more abstract vein, I was also messing about with bits and pieces of stained glass and creating some abstract and colorful compositions with that. To say I loved the colours in the stained glass would be an understatement. I’m like a kid faced with “Allsorts “candies! And the layers I could make, colour over colour and best of all, the effect of the sun shining through!

"Momentum", stained glass composition by Helen Bushell,  summerhouseart.com

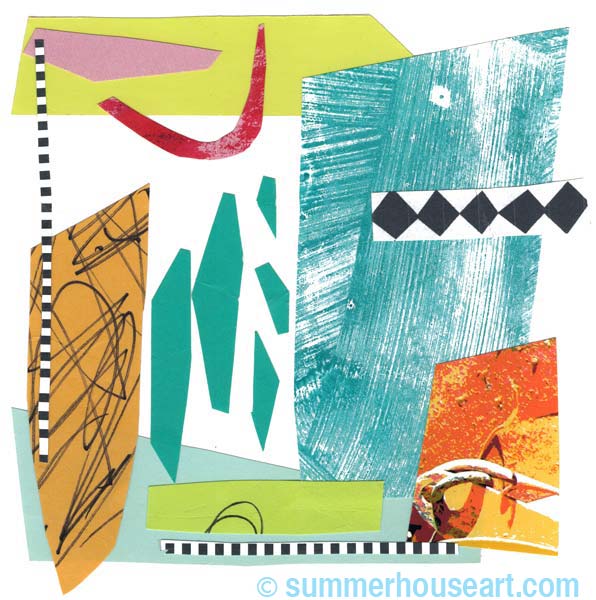
Alongside these experimental works I was also creating with paper and collage, mixing it up with papers and texture that I’d created into, again, abstract comps. Paper collage has so many possibilities, so many surfaces and colours, movement of shape and line.

"Moving Parts" collage by Helen Bushell, summerhouseart.com

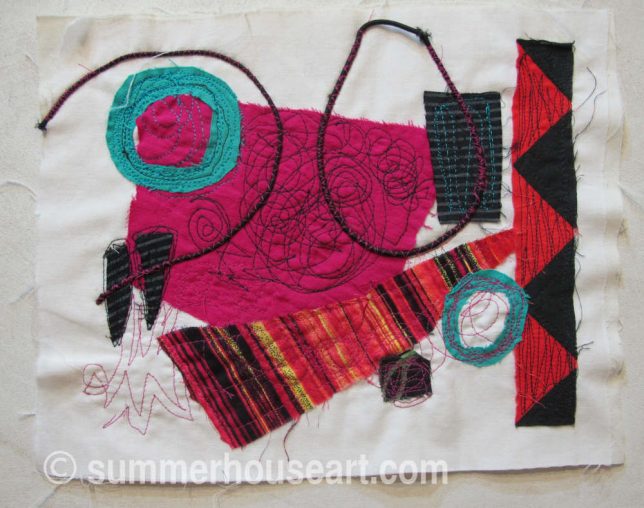
And now, with fabric, I’m finding that there is a bit of a correlation with all that I’m doing. Each set of materials presents it’s own learning curve and challenges. And I’ll admit to doing a bit more swearing while sewing. Me and machines, well, there is need for patience, I’m finding. But, the results and excitement of mixing up patterns, textures, lines and most of all colour, in fabric… well let’s just say I’m having fun but it has been a challenge.

Colourband, fabric collage, by Helen Bushell, summerhouseart.com

And I’m liking the sense of seeing that all my work somehow relates, whether in broken dishes, stained glass or paper and now fabric. So, today along with a few examples of my other forays into other mediums, I’m sharing a few new fabric collages. As with all the other mediums, often it’s finding a pattern or texture on a dish or glass or paper and now fabric, that leads to a composition.

Squares and Stripes, fabric collage, by Helen Bushell, summerhouseart.com

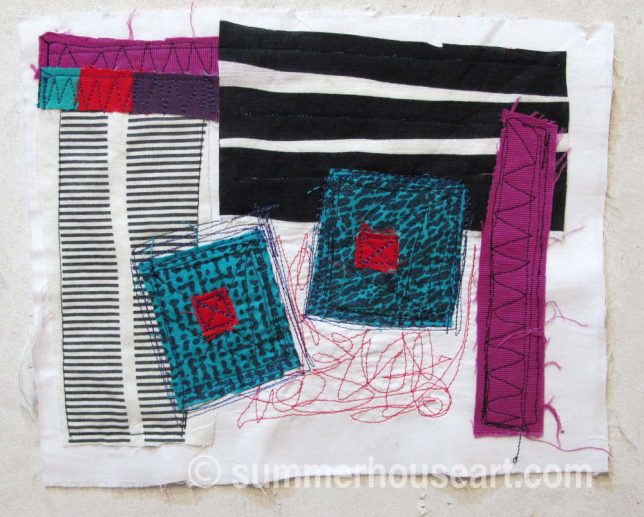
With these, it was finding fabric with some lovely exciting stripes. I’m a sucker for stripes.

Red Rocket, fabric collage, by Helen Bushell, summerhouseart.com

And then of course, colour. Colour is my talisman, and also the thing that attracts me every time. Like a hummingbird to a red flower. Each medium has it’s own qualities and permissions. Glass allows movement and space without having to think about how the grout will affect it all. Paper allows more texture than glass and more line. Then fabric, well, now I’m exploring creating line with thread, texture with layers and applique. More to come! But nothing abandoned. I’ll still create with mosaics, glass, paper collage and now fabric. Just more to add to the pot.

2 Turquoise Circles, fabric collage, by Helen Bushell, summerhouseart.com
Share

Bobbi’s Romantic Floral Mosaic Table

Mosaic Student Bobbi's table, summerhouseart.com

In my mosaic classes I teach Pique Assiette Mosaic, which is a type of mosaic made from broken dishes. This romantic floral table is the creation of my latest mosaic student, Bobbi. Most of the dishes were found in the “Shopping Class” where we poke through thrift shops looking for good dishes to break. By the second class we had a good start on a design. But before the 3rd Class, Bobbi had discovered while out shopping, a lovely little plate with a floral design that just begged to be featured as a focal point in the center of the table. The only problem was, she needed something to outline that focal point to set it off. A rummage through my stash of dish fragments presented a perfect dish, a pale green dish with embossed flowers, that I’d forgotten I even had! Continue reading “Bobbi’s Romantic Floral Mosaic Table”

Share

A Foray into Fabric Design

A while ago I created a mosaic from broken dishes, in a few of my favourite colours and patterns, all the pieces were Triangles.

Mosaic in Broken Dishes, Helen Bushell, summerhouseart.com

Now we are a couple who do NOT just sit around doing only things we already know how to do.  Oh no!  We sit around in front of youtube and watch tutorials on things like creating seamless patterns for fabric design.  And eventually we’ll manage to make a lot of designs, because it’s kind of fun.  Zazzle, which is a great Print on Demand company, happen to have fabric by the yard in Print on Demand.

So, after much work and learning, we created a seamless pattern based on the above mosaic.  We are rather pleased with the result. We called it Triangle Treat.  We’re offering it by the yard, in Combed Cotton, and you can also order Swatches and Fat Quarters of it for the Quilters.

Triangle Treat fabric, close up, Zazzle, Summerhouse Art

Triangle Treat Fabric, on Zazzle, SummerhouseArt

BTW, it’s really worth it to check out Zazzle and get on their email list because they are constantly having sales. Check out a little sample of what we have on Zazzle in our Zazzle shop page, where you can click directly to the shop itself.

Save

Save

Save

Share

A Couple of Mosaic Studies Transformed

Triangle Treat-mosaic-prints by Summerhouseart on Society 6
To see this product on Society 6 just click the image

My last post was about a couple of rather colorful mosaic studies made with broken dishes, one in small squares and the other in triangular shapes. These days we look at everything we do and wonder where else we can take that design. With all the print on demand opportunities you have a huge number of products you can put that artwork on.

We’ve both become interested in fabric and surface design and have been teaching ourselves how to take an idea and make it an all over pattern. So the mosaics presented an opportunity for experimentation. It was one thing to just take the original and make a print of it. Which I think worked out rather nicely…

Square On mosaic-prints by Summerhouseart on Society 6
Click the image to go to Society 6

But to create more with it, especially to create an all over pattern required days and days of trying things out, experimenting, and repeated trips to youtube tutorials as we refreshed our memories on the steps to take. Then back to Photoshop and Illustrator.

The triangles were actually quite successful as an all over design. We took out the grout digitally, of course, and basically blew the triangles further apart, did a bit of rearranging and created a quite seamless surface pattern with it. It looked quite wonderful on some of the Society 6 products like leggings

Triangle Treat-mosaic-leggings by Summerhouse Art
see this on Society 6 by clicking the image

or a phone case…

Triangle Treat-mosaic-cases by Summerhouseart on Society 6
click the image to see this on our shop on Society 6

and even entire comforters.

Triangle Treat-mosaic-comforters by Summerhouse Art
click the image to see this on our shop on Society 6

In fact, in the future we may even venture into fabric design with it.

The squares were a bit more difficult and in the end we decided to go with just more or less tiling the pattern, which is basically taking the square and repeating it over and over as it was. This too, looks quite good on a variety of products. Society 6 also allows you to scale the pattern so that you can have it larger on some things, like a tee

Square On-mosaic-all-over-print-shirts
click the image to see this on our shop on Society 6

or travel mug,

Square On-mosaic-metal-travel-mugs by Summerhouseart.com
click the image to see this on our shop on Society 6

or even smaller as an all over design on a duvet,

Triangle Treat-mosaic-leggings by Summerhouse Art
click the image to see this on our shop on Society 6

or a rug or shower curtain. But we’re not done yet and are coming up with even more products on other sites. We’ll have those up soon. It’s proving to be fun and challenging all at the same time. What more can you ask?

(BTW, if you’d like to make a comment, just click on the title.  It’ll take you to comments….and we do appreciate comments )


Save

Save

Save

Save

Share

Two Mosaic Studies Created With Broken Dishes

 Studies are like sketches or perhaps experiments. I quite like the idea of doing studies, just to see where an idea will lead, curious to see what it will look like when done.

Just working on small 6 inch by 6 inch pieces of wood as a base for the mosaic studies, I went through my many many containers of dish bits and put together a small set of colors and textures that appealed to me. The first piece was made using bits of dishes that I’d cut into only rectangular or squarish bits. The pieces aren’t exact or tidy rectangles or squares like you’d get with normal mosaics, but the uneven, variances that you get when cutting up dishes which I think adds to the surface interest.

I arranged them in an intuitive order, balancing the colors and textures as I went.

Mosaic in Broken Dishes, Helen Bushell, summerhouseart.com

Then, looking at my work table, I realized I had quite a few triangular pieces scattered about and decided that, as my next study, I would use only triangular bits of the same dishes. An entirely different composition but still fun to look at.

Mosaic in Broken Dishes, Helen Bushell, summerhouseart.com

Looking at them now, I’m quite enjoying them and seeing many possibilities as well. We’ve become interested in surface design in the last few years and Will and I have been having a bit of fun teaching ourselves how to make repeat patterns. And we’ve also been applying our work to all sorts of other products from prints to pillows on our various online Print on Demand shops like Society 6 and Red Bubble. Looking at these studies, I can see some fabric design ideas, prints and other possibilities. It’s a whole new avenue to explore. Watch this space to see what we make with these…..much more to come.

(BTW, if you’d like to make a comment, just click on the title.  It’ll take you to comments….and we do appreciate comments )

Save

Save

Share

Doing Some Artsy Experimenting with Beach Pottery

Beachcombing treasure summerhouseart.com

In the spring and summer I tend to check online for low tides. And if it’s nice out, and the tide is really low in the morning, I’ll be convincing Will that we really need to go beach combing in Sidney. Luckily, he usually doesn’t need much persuading. Now you don’t want to know how much beach pottery I’ve already collected.. ok, LOTS.

But there is something about wandering up and down on the beach, head and eyes down, with the sun and the seagulls overhead, the smell of the ocean around you, searching for those lucky finds. It’s so calming and lovely. If I’m going to have an addiction, I’ll take beach combing any day.

But what do you do with all these lovely finds? So far, we’ve had a good time creating birdbaths and mirror frames with it.

Beach Pottery Mosaic Birdbath by summerhouseart.com

We have plans, in the summer, for making a couple of garden sculptures covered in pottery.

And Will has been making jewelry from driftwood and beach glass and pottery for our new Etsy shop, FoundMadeArt.

Sea Pottery Pendant by Will Bushell, FoundMadeArt

I had an idea of creating small wall pieces with the bits all arranged like a collage, but shipping weight was a problem. Then I discovered Wedi board on an online mosaic site. It’s relatively unknown in Canada, I had to search like mad and finally found a tiling company in Nanaimo that had just started carrying it. It’s a light weight substrate created for bathroom tiling, with foam sandwiched between two thin layers of cement. Trust mosaic artists to see some new uses for this product. Suddenly a lightweight substrate for outdoor mosaic instead of heavy cement board!

I thought if I created some small wall pieces, they would be quite ship-able with the low weight. Wedi board is a bit more expensive than cement board and you have to buy special hangers for it too, but I thought, it would be worth a bit of experimentation. So with thanks to my sister and her husband, in Nanaimo, who very nicely brought down the 3ft x 5ft. sheet for me when they came for tea and goodies, I had something to work with.

The beauty of Wedi board is that you can cut it with a utility knife. I decided to start small with 6 in x 6 in pieces. Then, after lots more research online ( don’t you just love youtube?) I decided to cover each piece with a thin coat of mortar to hide the grey surface.

Then came playing and trying out layouts some chosen bits of found beach pottery. All, btw, freshly washed and dried to remove the salt residue. Kind of funny to think there I was washing dishes that had come from the ocean.

playing with beach pottery layout, summerhouseart.com

The first experimental arrangement went through lots of changes, I even took photos so I could test the look.

Beach Pottery layout, summerhouseart.com

And then, with the air getting rather blue, because of the difficulty of trying to adhere the pieces without getting mortar everywhere, the first piece was done.

Beach Pottery wall piece, Helen Bushell, summerhouseart.com

For the next piece, I decided to wing it. I basically chose the pottery I was hoping to use and applied mortar and stuck them down with less worry about placement, using intuition and speed mainly. You don’t have much time with mortar anyway. It may be a method I’ll use in the future, when I try to create more of these little wall pieces. These are just the start of a new idea. Who knows where it will lead? One day, hopefully, they’ll be for sale on our Etsy shop. One thing I do know, is that I’ve got an awful lot of beach finds that need a home. And I do have a bit of beach combing addiction.

Beach Pottery wall piece, Helen Bushell, summerhouseart.com

(BTW, if you’d like to make a comment, just click on the title.  It’ll take you to comments….and we do appreciate comments )

Save

Save

Save

Save

Save

Save

Save

Save

Save

Share

Creating Texture and … Boomerangs?

The fun of working in Pique assiette mosaic is the inspiration you can find in a simple plate design. Trolling a thrift store one day, I’d found just a couple of plates with a pattern around the edge that just felt like the 50’s, bringing ideas of mid century design with it. I love that time in design. So optimistic about the future, so modern, and colorful.

One of the first things I show my students, sometimes even before we go shopping for good dishes to break, is how to create texture with lines. These plates are a perfect example. All the lines pretty well went from the outside to the inside of the rim with all lines going toward the center. But, when you break the plate, you have all these nice bits and pieces with lines that can be put back together in every which way. And that arbitrary rearrangement is exactly what creates this lovely texture.

 detail bits,Boomerang Mirror by Helen Bushell summerhouseart.comSince the design on the plate inspired me to think 50’s, one thing sort of naturally led to another.

 Boomerang Mirror by Helen Bushell summerhouseart.com

Boomerang Mirror by Helen Bushell summerhouseart.com

Boomerang Mirror by Helen Bushell summerhouseart.comA popular shape then was the boomerang which inspired a whole lot of boomerang shaped tables at the time. Ok I didn’t have enough dishes to create a top for a coffee table, but, I did have enough, with a little embellishment from other colors and tiles…..

to make Boomerang mirror. It’s not that big, at its widest point only 24 inches, but it packs an nice punch of lovely 50’s inspired color.

Boomerang Mirror by Helen Bushell summerhouseart.com

Share

Bridges of London and Budgerigars, a New Pique Assiette Mosaic

Bridges of London and Budgerigars Detail, Helen Bushell, summerhouseart.com

the inspiration
I’d had this fantastic plate with the bridges of London all around the rim for ages. I’d had a few ideas for it but nothing that really inspired me into action. Nevertheless, I’d broken up the pieces and kept them together with masking tape for years. They were waiting for me, dust covered and dirty, on my studio shelf. And no, I don’t dust my studio much, there are just too many dishes and ornaments and I’d never get anything else done. Priorities you know.

Bridges of London and Budgerigars Detail, Helen Bushell, summerhouseart.com

the ingredients
For some odd reason I’d always thought of the bridges with Budgies or Budgerigars as the Brits called them. For me they went to together. I just happened to also have a “loverly” set of salt and pepper shaker blue budgies. And I also just happened to have a plate covered in, what else, English Ivy.  Ah the joys of having lots of used plates and ornaments to recycle and transform into something fun.

And that “something fun” was a new mirror for over the sink, so I’d have something entertaining to look at while doing dishes. There are always so many dishes to wash aren’t there? And me, I’ve got a low boredom threshold.

But what shape could this take? What would tie it all together? Finally, inspiration struck. An English Mantel clock! Or at least the shape of one….yes that would work. And with that, all the other questions were answered. I needed another plate for the “shoulders”, easy to find, waiting there all along in my studio stash. And the final touch? Well, what are the Brits famous for? Their gardens of course! So out came the porcelain flowers. You know, those little bouquets your mum collected.

Bridges of London and Budgerigars Beginning, Helen Bushell, summerhouseart.com

the finished piece
It took a while, but finally all the pieces were in place.  Well, almost, the budgie perches needed mosaic and the grouting needed doing.

Bridges of London and Budgerigars Detail, Helen Bushell, summerhouseart.com

The only thing left to do was glue on the budgies and the flowers. With a bit of careful chiseling I freed some flowers and leaves from their little porcelain pots and glued them into place.

Bridges of London and Budgerigars Detail, Helen Bushell, summerhouseart.com

Now, I’ve got the Bridges and Budgerigars of London over my sink, surrounding a mirror that reflects the stained glass window we bought years ago, also from England. And I must say, I rather like it.

Bridges of London and Budgerigars,  Helen Bushell, summerhouseart.com

Share

#6 in the Pique Assiette Mosaic Inspiration Series – Using Intuitive Design on Pots or How Not to Be a Control Freak

Mosaic Inspiration #4 I talked about the intuitive process to create an overall random design on a flat surface like a mirror. And if you’ve looked at our stepping stones you’ll see that I use this method there as well. I admit, I like working this way, it’s meditative and challenging at the same time and never boring. And there are benefits!

 Mosaic Pot by Helen Bushell, summerhouseart.com

Now, I have to say that working like this is especially fun on 3D surfaces like pots. I’ve done quite a few pots in this manner. In each case, I selected dishes that had colors, patterns and textures that I liked together. To those, I added some solid colors and a few marbles. Marbles have a way of glowing when the light shines through, that I find totally captivating.

Pique assiette Mosaic Pot by Helen Bushell, summerhouseart.com

I tell my students that doing intuitive mosaic design has one really great benefit, especially if you tend to be a control freak. You will learn to let go. Working intuitively allows you to forget control and just go with the flow. After all you are not creating a picture, or a rigid pattern. Nope, just an overall pattern with a mixture of surface designs. Ah, the freedom to just let go and mix it up.

Going with the flow also applies to fitting dishes onto a curved surface. A dish does not have the same curvature as a pot. To make up for this you often have to adjust how you apply a piece to the curve of the pot. Oh sure, you can keep breaking the piece till it’s small enough to apply to the curve ( um, this could be called exerting control) or…you can just find the curve of the dish and find a place where it will match the curve of the pot. Ah, even less control.


Pique assiette Mosaic Pot by Helen Bushell, summerhouseart.com


Pique assiette Mosaic Pot by Helen Bushell, summerhouseart.com

Using dishes that have color on the bottom as well, creates an extra little benefit. The ridge on the under side of the plate, once broken, can be pieced back together to create some very nice undulating lines, thank you. I’ve used this often to create a flow or direction. It’s a little trick that I totally took advantage of on some of these pots.

Pique assiette Mosaic Pot by Helen Bushell, summerhouseart.com

The last little benefit about applying pique assiette mosaic to pots is that unlike a flat surface like a tray or mirror frame, you can’t see the whole surface at once. You may ask, how is this a benefit? Well, if you get tired of one side you just turn the pot around and viola, you have a whole new surface to feast your eyes on.

Share

Pique Assiette Mosaic Stepping Stones in the Garden

We love making mosaic stepping stones for our garden. They’re fun and easy to do. Well, easy as in low tech. But they do take a bit of work. It’s a chance to use some dishes and tile and sometimes other objects to create some color in the garden. Using dishes and other found objects for mosaic is called Pique Assiette.  I like the whole process of using dishes and found objects, collecting them, finding them and of course breaking them to create new patterns.

Pique Assiette Stepping stone, summerhouseart.com

The other day, instead of grouting inside in the studio, I’d set up a work table under the clematis pergola so my afternoon student could grout her mosaic outside in the garden. After she’d finished, very happy with how her piece had worked out, and had gone home with her mosaic creation, we still had the work table set up. I’d done a quick demo of stepping stones for her on a small chunk of broken cement block while she was there. So we had everything ready, and we turned to each other and almost had the same thought at the same time. Hey, lets make another stepping stone.

Pique Assiette Stepping Stone, summerhouseart.com

So off we went, into the studio, to gather up some dishes and tiles to use. We mixed up some more mortar and started. Before we knew it was 8 pm and time to stop and have a quick supper. We still hadn’t grouted but the stepping stones were done. I got out there this morning and grouted mine. So another stone for the garden.

Pique Assiette Stepping Stone, summerhouseart.com

We enjoy the look of these little art pieces. Each one is different and unique. We have some laid into the lawn under the pergola, to create a sort of patio area. Others become entrance art at the gate, or as a way to step through the garden to the car, or as a bottom step from the deck.

Pique Assiette Stepping Stone, summerhouseart.com

Will and I work totally differently. He likes to create much more minimal abstract compositions. I tend to use dishes with either floral patterns or just basically colorful dishes laid out in an overall sort of crazy quilt manner. We work quickly and without too much thought, counting on our innate sense of composition to work for us. We just relax and enjoy the time.

Pique Assiette Stepping Stone, summerhouseart.com

Pique Assiette Stepping Stone, summerhouseart.com

Pique Assiette Stepping Stones, summerhouseart.com

There’s something about mosaic sparkling in the sunshine and greenery of the garden that makes you enjoy having it underfoot.

Pique Assiette Stepping Stone, summerhouseart.com

Pique Assiette Stepping Stone, summerhouseart.com

Pique Assiette Stepping Stones, summerhouseart.com

If you are interested in creating some stepping stones for your garden and don’t know how, you are in for a treat. My next post is all about how to create mosaic stepping stones. There are lots of ways to do this, but this is my way.

Now you may have noticed that we didn’t tell you which of us created all of the stepping stones in this blog.  So, which ones do you think are mine and which ones are Will’s?

(BTW, if you’d like to make a comment, just click on the title.  It’ll take you to comments….and we do appreciate comments )

Save

Share